


Welcome to AI for Game Development! On this series, we’ll be using AI tools to create a totally functional farming game in only 5 days. By the tip of this series, you’ll have learned how you may incorporate quite a lot of AI tools into your game development workflow. I’ll show you the way you need to use AI tools for:
- Art Style
- Game Design
- 3D Assets
- 2D Assets
- Story
Want the fast video version? You may watch it here. Otherwise, in case you want the technical details, keep reading!
Note: This tutorial is meant for readers who’re accustomed to Unity development and C#. If you happen to’re latest to those technologies, try the Unity for Beginners series before continuing.
Day 4: 2D Assets
In Part 3 of this tutorial series, we discussed how text-to-3D is not quite ready yet. Nonetheless, the story is far different for 2D.
On this part, we’ll speak about how you need to use AI to generate 2D Assets.
Preface
This tutorial describes a collaborative process for generating 2D Assets, where Stable Diffusion is incorporated as a tool in a standard 2D workflow. This is meant for readers with some knowledge of image editing and 2D asset creation but may otherwise be helpful for beginners and experts alike.
Requirements:
- Your selected image-editing software, reminiscent of Photoshop or GIMP (free).
- Stable Diffusion. For instructions on establishing Stable Diffusion, confer with Part 1.
Image2Image
Diffusion models reminiscent of Stable Diffusion work by reconstructing images from noise, guided by text. Image2Image uses the identical process but starts with real images as input quite than noise. Which means the outputs will, to some extent, resemble the input image.
A very important parameter in Image2Image is denoising strength. This controls the extent to which the model changes the input. A denoising strength of 0 will reproduce the input image exactly, while a denoising strength of 1 will generate a really different image. One other strategy to take into consideration denoising strength is creativity. The image below demonstrates image-to-image with an input image of a circle and the prompt “moon”, at various denoising strengths.

Image2Image allows Stable Diffusion for use as a tool, quite than as a substitute for the standard artistic workflow. That’s, you may pass your individual handmade assets to Image2Image, iterate back on the result by hand, and so forth. Let’s take an example for the farming game.
Example: Corn
On this section, I’ll walk through how I generated a corn icon for the farming game. As a place to begin, I sketched a really rough corn icon, intended to put out the composition of the image.

Next, I used Image2Image to generate some icons using the next prompt:
corn, james gilleard, atey ghailan, pixar concept artists, stardew valley, animal crossing
I used a denoising strength of 0.8, to encourage the model to be more creative. After generating several times, I discovered a result I liked.
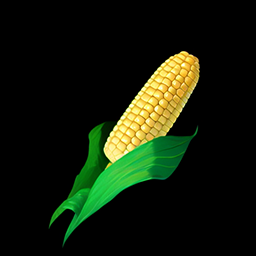
The image doesn’t have to be perfect, just within the direction you are going for, since we’ll keep iterating. In my case, I liked the style that was produced, but thought the stalk was a bit too intricate. So, I made some modifications in photoshop.

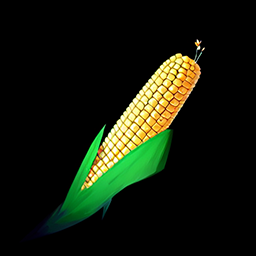
Notice that I roughly painted over the parts I wanted to alter, allowing Stable Diffusion to fill the main points in. I dropped my modified image back into Image2Image, this time using a lower denoising strength of 0.6 since I didn’t wish to deviate too removed from the input. This resulted in an icon I used to be almost glad with.
The bottom of the corn stalk was only a bit too painterly for me, and there was a sprout coming out of the highest. So, I painted over these in photoshop, made another pass in Stable Diffusion, and removed the background.
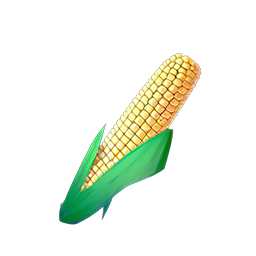
Voilà, a game-ready corn icon in lower than 10 minutes. Nonetheless, you would spend way more time to get a greater result. I like to recommend this video for a more detailed walkthrough of constructing a more intricate asset.
Example: Scythe
In lots of cases, it’s possible you’ll must fight Stable Diffusion a bit to get the result you are going for. For me, this was definitely the case for the scythe icon, which required lots of iteration to get within the direction I used to be going for.

The problem likely lies within the proven fact that there are far more images online of scythes as weapons quite than as farming tools. A technique around that is prompt engineering, or fidgeting with the prompt to attempt to push it in the suitable direction, i.e. writing scythe, scythe tool within the prompt or weapon within the negative prompt. Nonetheless, this is not the one solution.
Dreambooth, textual inversion, and LoRA are techniques for customizing diffusion models, making them capable of manufacturing results way more specific to what you are going for. These are outside the scope of this tutorial, but are price mentioning, as they’re becoming increasingly outstanding in the world of 2D Asset generation.
Generative services reminiscent of layer.ai and scenario.gg are specifically targeted toward game asset generation, likely using techniques reminiscent of dreambooth and textual inversion to permit game developers to generate style-consistent assets. Nonetheless, it stays to be seen which approaches will rise to the highest within the emerging generative game development toolkit.
If you happen to’re concerned about diving deeper into these advanced workflows, try this blog post and space on Dreambooth training.
Click here to read Part 5, where we use AI for Story.