

A few yr ago, we showed you distribute the training of Hugging Face transformers on a cluster or third-generation Intel Xeon Scalable CPUs (aka Ice Lake). Recently, Intel has launched the fourth generation of Xeon CPUs, code-named Sapphire Rapids, with exciting recent instructions that speed up operations commonly present in deep learning models.
On this post, you’ll learn speed up a PyTorch training job with a cluster of Sapphire Rapids servers running on AWS. We are going to use the Intel oneAPI Collective Communications Library (CCL) to distribute the job, and the Intel Extension for PyTorch (IPEX) library to robotically put the brand new CPU instructions to work. As each libraries are already integrated with the Hugging Face transformers library, we’ll have the ability to run our sample scripts out of the box without changing a line of code.
In a follow-up post, we’ll take a look at inference on Sapphire Rapids CPUs and the performance boost that they convey.
Why You Should Consider Training On CPUs
Training a deep learning (DL) model on Intel Xeon CPUs generally is a cost-effective and scalable approach, especially when using techniques corresponding to distributed training and fine-tuning on small and medium datasets.
Xeon CPUs support advanced features corresponding to Advanced Vector Extensions (AVX-512) and Hyper-Threading, which help improve the parallelism and efficiency of DL models. This allows faster training times in addition to higher utilization of hardware resources.
As well as, Xeon CPUs are generally cheaper and widely available in comparison with specialized hardware corresponding to GPUs, that are typically required for training large deep learning models. Xeon CPUs may also be easily repurposed for other production tasks, from web servers to databases, making them a flexible and versatile alternative on your IT infrastructure.
Finally, cloud users can further reduce the associated fee of coaching on Xeon CPUs with spot instances. Spot instances are built from spare compute capacities and sold at a reduced price. They’ll provide significant cost savings in comparison with using on-demand instances, sometimes as much as 90%. Last but not least, CPU spot instances are also generally easier to acquire than GPU instances.
Now, let’s take a look at the brand new instructions within the Sapphire Rapids architecture.
Advanced Matrix Extensions: Latest Instructions for Deep Learning
The Sapphire Rapids architecture introduces the Intel Advanced Matrix Extensions (AMX) to speed up DL workloads. Using them is as easy as installing the newest version of IPEX. There is no such thing as a need to vary anything in your Hugging Face code.
The AMX instructions speed up matrix multiplication, an operation central to training DL models on data batches. They support each Brain Floating Point (BF16) and 8-bit integer (INT8) values, enabling acceleration for various training scenarios.
AMX introduces recent 2-dimensional CPU registers, called tile registers. As these registers have to be saved and restored during context switches, they require kernel support: On Linux, you will need v5.16 or newer.
Now, let’s examine how we are able to construct a cluster of Sapphire Rapids CPUs for distributed training.
Constructing a Cluster of Sapphire Rapids CPUs
On the time of writing, the best method to get your hands on Sapphire Rapids servers is to make use of the brand new Amazon EC2 R7iz instance family. Because it’s still in preview, you may have to enroll to get access. As well as, virtual servers don’t yet support AMX, so we’ll use bare metal instances (r7iz.metal-16xl, 64 vCPU, 512GB RAM).
To avoid organising each node within the cluster manually, we’ll first arrange the master node and create a brand new Amazon Machine Image (AMI) from it. Then, we’ll use this AMI to launch additional nodes.
From a networking perspective, we’ll need the next setup:
-
Open port 22 for ssh access on all instances for setup and debugging.
-
Configure password-less ssh from the master instance (the one you will launch training from) to all other instances (master included). In other words, the ssh public key of the master node have to be authorized on all nodes.
-
Allow all network traffic contained in the cluster, in order that distributed training runs unencumbered. AWS provides a secure and convenient method to do that with security groups. We just have to create a security group that enables all traffic from instances configured with that very same security group and make certain to connect it to all instances within the cluster. Here’s how my setup looks.

Let’s get to work and construct the master node of the cluster.
Setting Up the Master Node
We first create the master node by launching an r7iz.metal-16xl instance with an Ubunutu 20.04 AMI (ami-07cd3e6c4915b2d18) and the safety group we created earlier. This AMI includes Linux v5.15.0, but Intel and AWS have fortunately patched the kernel so as to add AMX support. Thus, we need not upgrade the kernel to v5.16.
Once the instance is running, we ssh to it and check with lscpu that AMX are indeed supported. You need to see the next within the flags section:
amx_bf16 amx_tile amx_int8
Then, we install native and Python dependencies.
sudo apt-get update

# Install tcmalloc for extra performance (https://github.com/google/tcmalloc)
sudo apt install libgoogle-perftools-dev -y

# Create a virtual environment
sudo apt-get install python3-pip -y
pip install pip --upgrade
export PATH=/home/ubuntu/.local/bin:$PATH
pip install virtualenv

# Activate the virtual environment
virtualenv cluster_env
source cluster_env/bin/activate

# Install PyTorch, IPEX, CCL and Transformers
pip3 install torch==1.13.0 -f https://download.pytorch.org/whl/cpu
pip3 install intel_extension_for_pytorch==1.13.0 -f https://developer.intel.com/ipex-whl-stable-cpu
pip3 install oneccl_bind_pt==1.13 -f https://developer.intel.com/ipex-whl-stable-cpu
pip3 install transformers==4.24.0

# Clone the transformers repository for its example scripts
git clone https://github.com/huggingface/transformers.git
cd transformers
git checkout v4.24.0
Next, we create a brand new ssh key pair called ‘cluster’ with ssh-keygen and store it on the default location (~/.ssh).
Finally, we create a recent AMI from this instance.
Setting Up the Cluster
Once the AMI is prepared, we use it to launch 3 additional r7iz.16xlarge-metal instances, without forgetting to connect the safety group created earlier.
While these instances are starting, we ssh to the master node to finish the network setup. First, we edit the ssh configuration file at ~/.ssh/config to enable password-less connections from the master to all other nodes, using their private IP address and the important thing pair created earlier. Here’s what my file looks like.
Host 172.31.*.*
   StrictHostKeyChecking no

Host node1
    HostName 172.31.10.251
    User ubuntu
    IdentityFile ~/.ssh/cluster

Host node2
    HostName 172.31.10.189
    User ubuntu
    IdentityFile ~/.ssh/cluster

Host node3
    HostName 172.31.6.15
    User ubuntu
    IdentityFile ~/.ssh/cluster
At this point, we are able to use ssh node[1-3] to hook up with any node with none prompt.
On the master node sill, we create a ~/hosts file with the names of all nodes within the cluster, as defined within the ssh configuration above. We use localhost for the master as we’ll launch the training script there. Here’s what my file looks like.
localhost
node1
node2
node3
The cluster is now ready. Let’s start training!
Launching a Distributed Training Job
In this instance, we’ll fine-tune a DistilBERT model for query answering on the SQUAD dataset. Be happy to try other examples for those who’d like.
source ~/cluster_env/bin/activate
cd ~/transformers/examples/pytorch/question-answering
pip3 install -r requirements.txt
As a sanity check, we first launch a neighborhood training job. Please note several necessary flags:
no_cudamakes sure the job is ignoring any GPU on this machine,use_ipexenables the IPEX library and thus the AVX and AMX instructions,bf16enables BF16 training.
export LD_PRELOAD="/usr/lib/x86_64-linux-gnu/libtcmalloc.so"
python run_qa.py --model_name_or_path distilbert-base-uncased
--dataset_name squad --do_train --do_eval --per_device_train_batch_size 32
--num_train_epochs 1  --output_dir /tmp/debug_squad/
--use_ipex --bf16 --no_cuda
No have to let the job run to completion, We just run for a minute to make certain that every one dependencies have been appropriately installed. This also gives us a baseline for single-instance training: 1 epoch takes about 26 minutes. For reference, we clocked the identical job on a comparable Ice Lake instance (c6i.16xlarge) with the identical software setup at 3 hours and half-hour per epoch. That is an 8x speedup. We are able to already see how helpful the brand new instructions are!
Now, let’s distribute the training job on 4 instances. An r7iz.16xlarge instance has 32 physical CPU cores, which we prefer to work with directly as a substitute of using vCPUs (KMP_HW_SUBSET=1T). We resolve to allocate 24 cores for training (OMP_NUM_THREADS) and a couple of for CCL communication (CCL_WORKER_COUNT), leaving the last 6 threads to the kernel and other processes. The 24 training threads support 2 Python processes (NUM_PROCESSES_PER_NODE). Hence, the overall variety of Python jobs running on the 4-node cluster is 8 (NUM_PROCESSES).
# Arrange environment variables for CCL
oneccl_bindings_for_pytorch_path=$(python -c "from oneccl_bindings_for_pytorch import cwd; print(cwd)")
source $oneccl_bindings_for_pytorch_path/env/setvars.sh

export MASTER_ADDR=172.31.3.190
export NUM_PROCESSES=8
export NUM_PROCESSES_PER_NODE=2
export CCL_WORKER_COUNT=2
export CCL_WORKER_AFFINITY=auto
export KMP_HW_SUBSET=1T
Now, we launch the distributed training job.
# Launch distributed training
mpirun -f ~/hosts
 -n $NUM_PROCESSES -ppn $NUM_PROCESSES_PER_NODE
 -genv OMP_NUM_THREADS=24
 -genv LD_PRELOAD="/usr/lib/x86_64-linux-gnu/libtcmalloc.so"
 python3 run_qa.py
 --model_name_or_path distilbert-base-uncased
 --dataset_name squad
 --do_train
 --do_eval
 --per_device_train_batch_size 32
 --num_train_epochs 1
 --output_dir /tmp/debug_squad/
 --overwrite_output_dir
 --no_cuda
 --xpu_backend ccl
 --bf16
One epoch now takes 7 minutes and 30 seconds.
Here’s what the job looks like. The master node is at the highest, and you possibly can see the 2 training processes running on each one in every of the opposite 3 nodes.
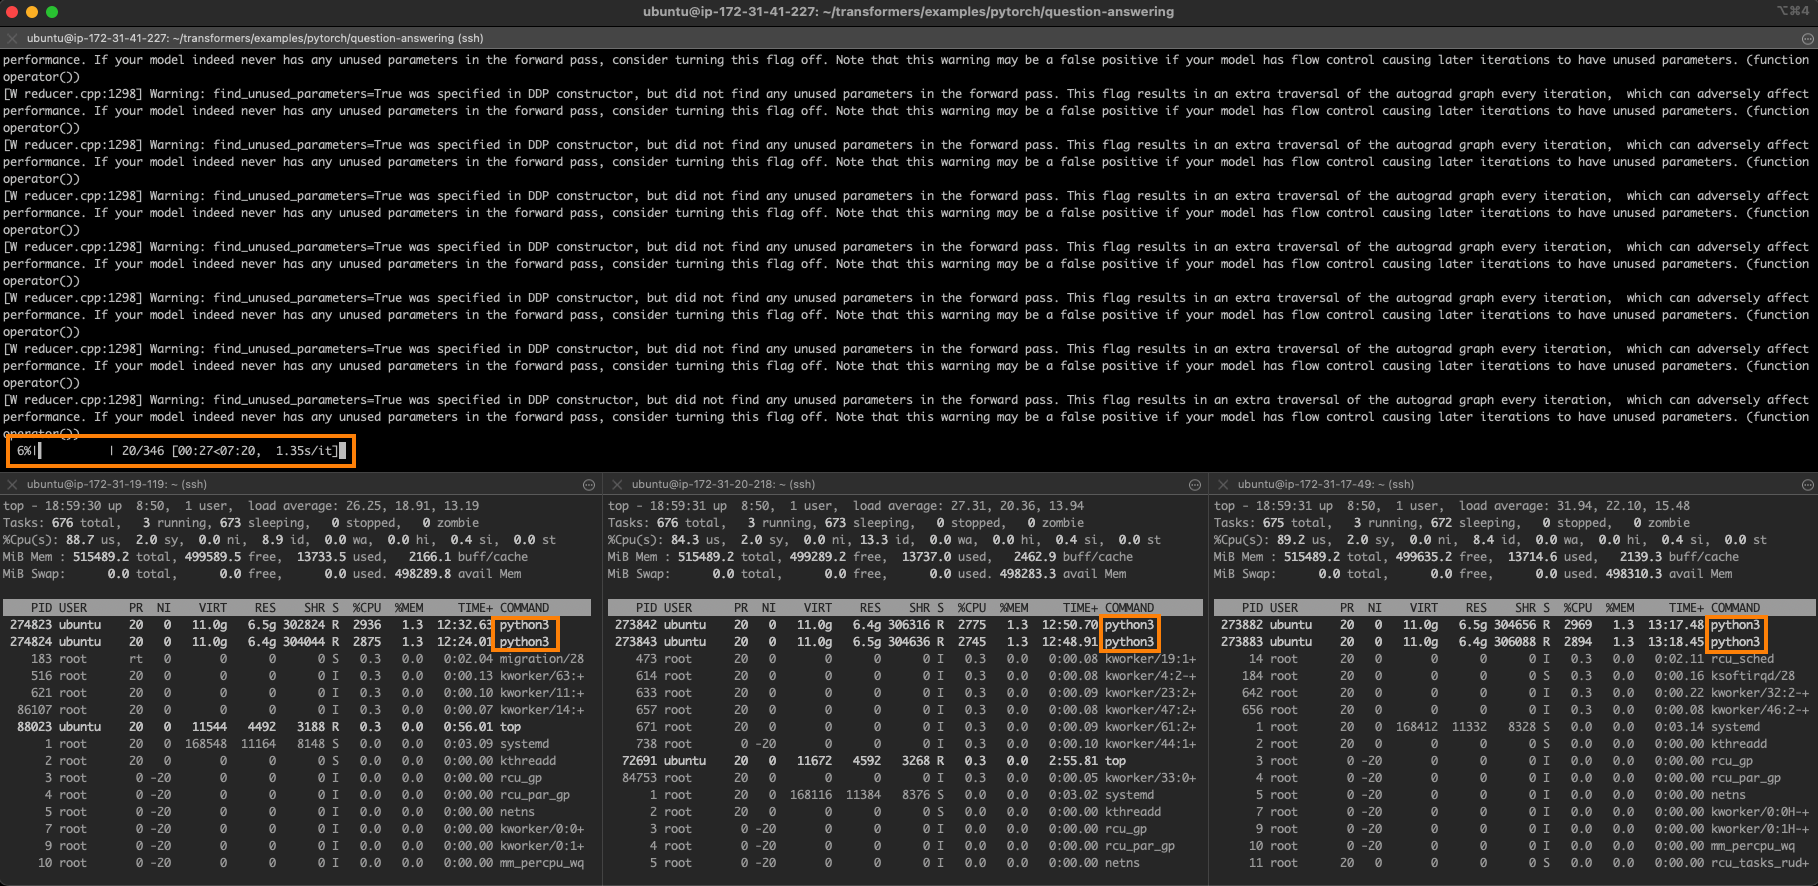
Perfect linear scaling on 4 nodes can be 6 minutes and 30 seconds (26 minutes divided by 4). We’re very near this ideal value, which shows how scalable this approach is.
Conclusion
As you possibly can see, training Hugging Face transformers on a cluster of Intel Xeon CPUs is a versatile, scalable, and cost-effective solution, especially for those who’re working with small or medium-sized models and datasets.
Listed below are some additional resources to enable you start:
If you may have questions or feedback, we would like to read them on the Hugging Face forum.
Thanks for reading!