
Dreambooth is a method to show latest concepts to Stable Diffusion using a specialized type of fine-tuning. Some people have been using it with just a few of their photos to position themselves in improbable situations, while others are using it to include latest styles. 🧨 Diffusers provides a Dreambooth training script. It doesn’t take long to coach, nevertheless it’s hard to pick out the precise set of hyperparameters and it is easy to overfit.
We conducted plenty of experiments to research the effect of various settings in Dreambooth. This post presents our findings and a few suggestions to enhance your results when fine-tuning Stable Diffusion with Dreambooth.
Before we start, please remember that this method should never be used for malicious purposes, to generate harm in any way, or to impersonate people without their knowledge. Models trained with it are still sure by the CreativeML Open RAIL-M license that governs distribution of Stable Diffusion models.
Note: a previous version of this post was published as a W&B report.
TL;DR: Really useful Settings
- Dreambooth tends to overfit quickly. To get good-quality images, we must discover a ‘sweet spot’ between the number of coaching steps and the educational rate. We recommend using a low learning rate and progressively increasing the variety of steps until the outcomes are satisfactory.
- Dreambooth needs more training steps for faces. In our experiments, 800-1200 steps worked well when using a batch size of two and LR of 1e-6.
- Prior preservation is vital to avoid overfitting when training on faces. For other subjects, it doesn’t appear to make an enormous difference.
- In case you see that the generated images are noisy or the standard is degraded, it likely means overfitting. First, try the steps above to avoid it. If the generated images are still noisy, use the DDIM scheduler or run more inference steps (~100 worked well in our experiments).
- Training the text encoder along with the UNet has a big effect on quality. Our greatest results were obtained using a mixture of text encoder fine-tuning, low LR, and an appropriate variety of steps. Nonetheless, fine-tuning the text encoder requires more memory, so a GPU with a minimum of 24 GB of RAM is right. Using techniques like 8-bit Adam,
fp16training or gradient accumulation, it is feasible to coach on 16 GB GPUs just like the ones provided by Google Colab or Kaggle. - Tremendous-tuning with or without EMA produced similar results.
- There isn’t any need to make use of the
sksword to coach Dreambooth. One among the primary implementations used it since it was a rare token within the vocabulary, nevertheless it’s actually a form of rifle. Our experiments, and people by for instance @nitrosocke show that it’s okay to pick out terms that you simply’d naturally use to explain your goal.
Learning Rate Impact
Dreambooth overfits in a short time. To get good results, tune the educational rate and the number of coaching steps in a way that is smart in your dataset. In our experiments (detailed below), we fine-tuned on 4 different datasets with high and low learning rates. In all cases, we got higher results with a low learning rate.
Experiments Settings
All our experiments were conducted using the train_dreambooth.py script with the AdamW optimizer on 2x 40GB A100s. We used the identical seed and kept all hyperparameters equal across runs, except LR, number of coaching steps and the usage of prior preservation.
For the primary 3 examples (various objects), we fine-tuned the model with a batch size of 4 (2 per GPU) for 400 steps. We used a high learning rate of 5e-6 and a low learning rate of 2e-6. No prior preservation was used.
The last experiment attempts so as to add a human subject to the model. We used prior preservation with a batch size of two (1 per GPU), 800 and 1200 steps on this case. We used a high learning rate of 5e-6 and a low learning rate of 2e-6.
Note which you can use 8-bit Adam, fp16 training or gradient accumulation to cut back memory requirements and run similar experiments on GPUs with 16 GB of memory.
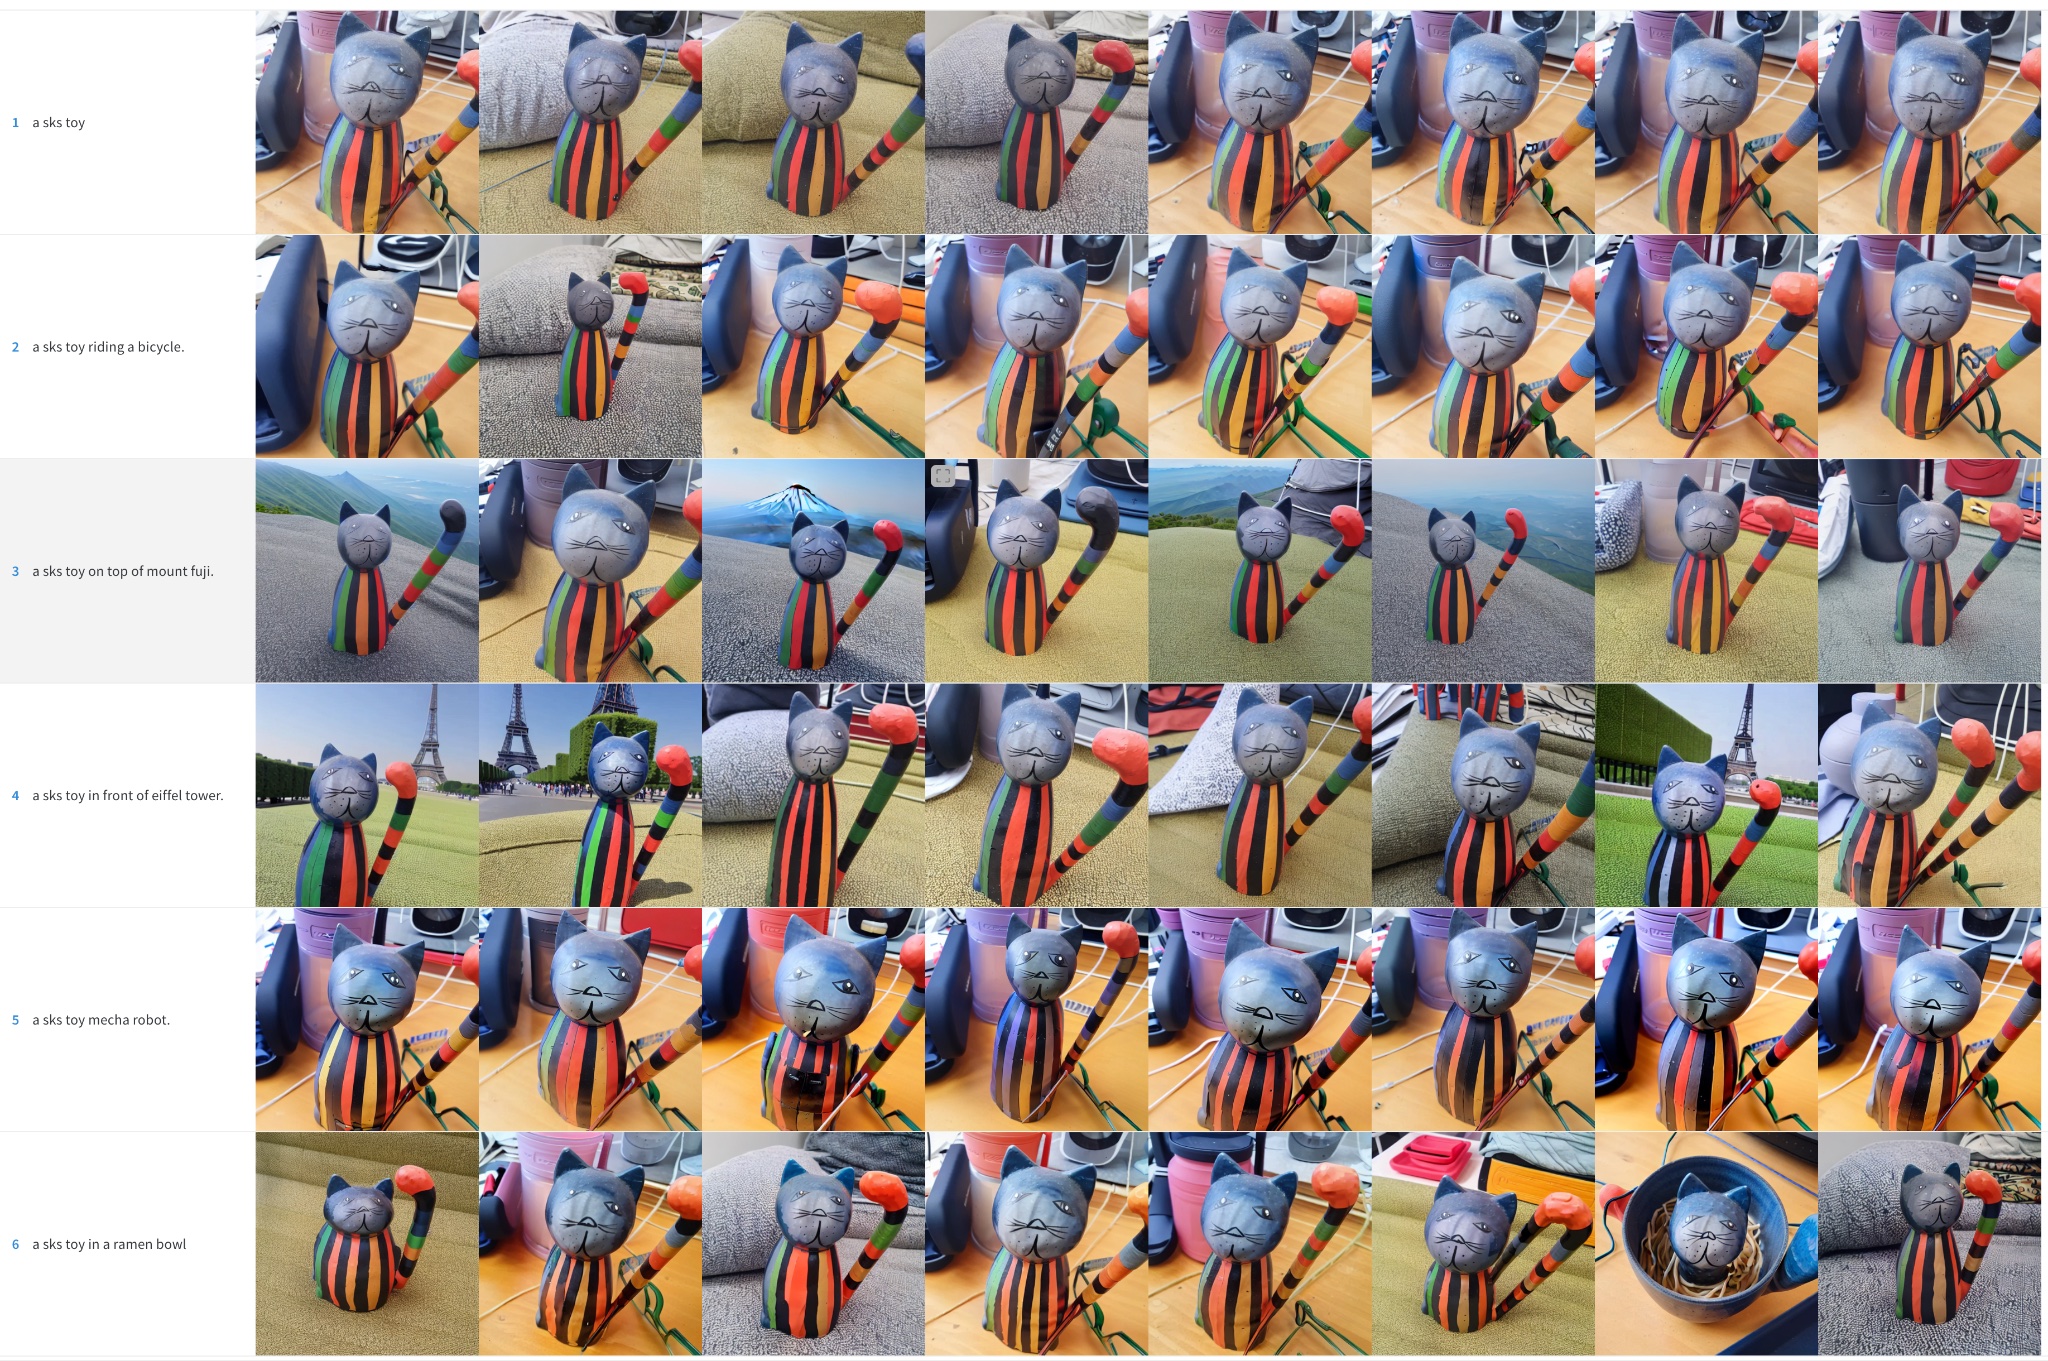
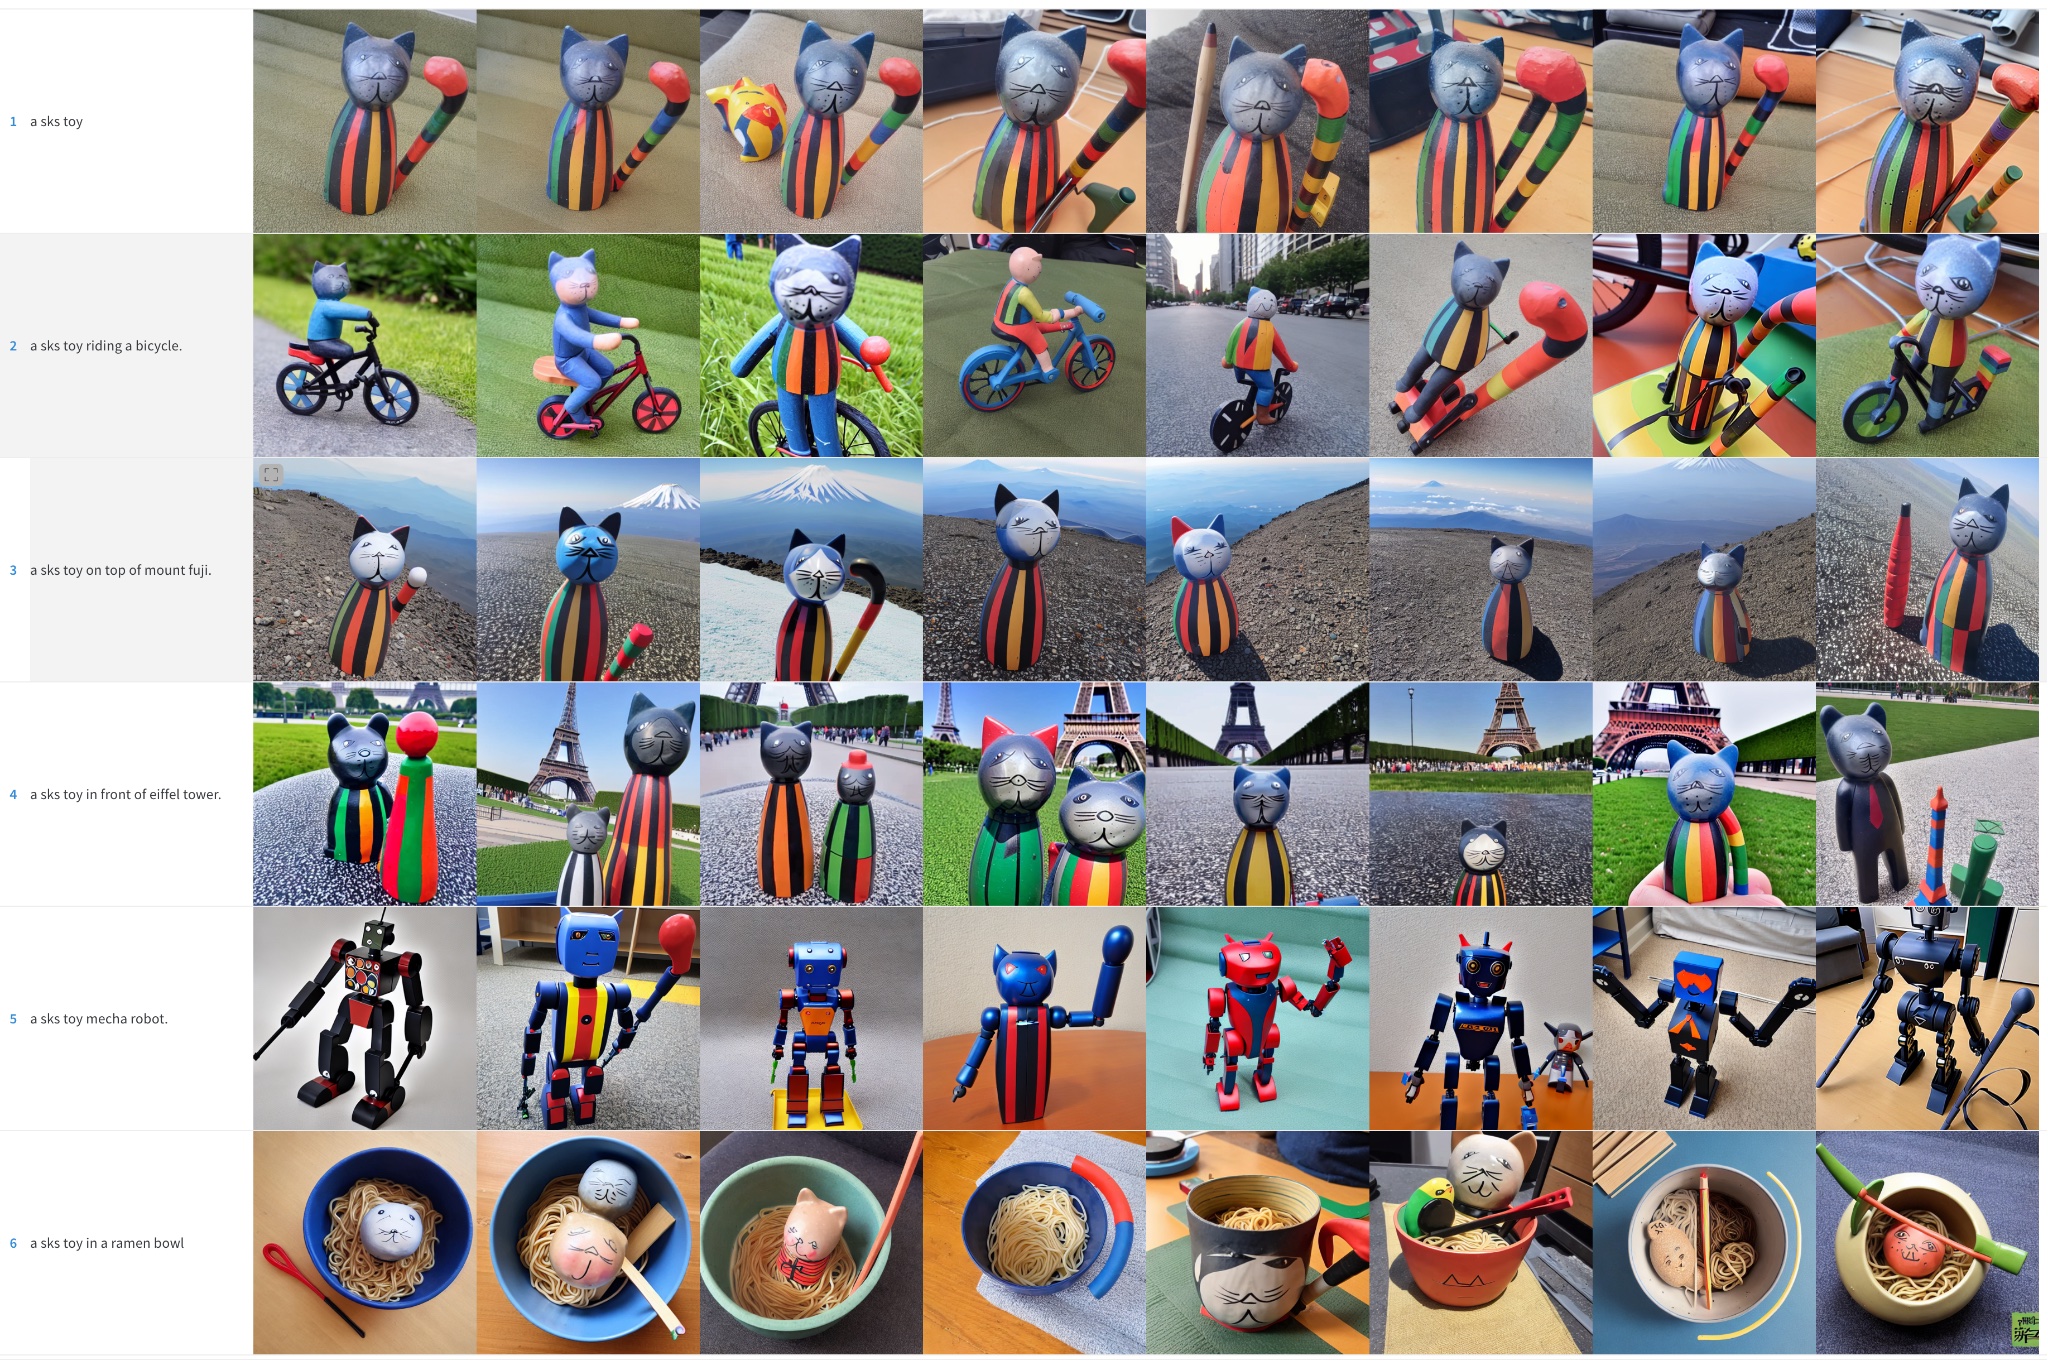
Cat Toy
High Learning Rate (5e-6)
Low Learning Rate (2e-6)
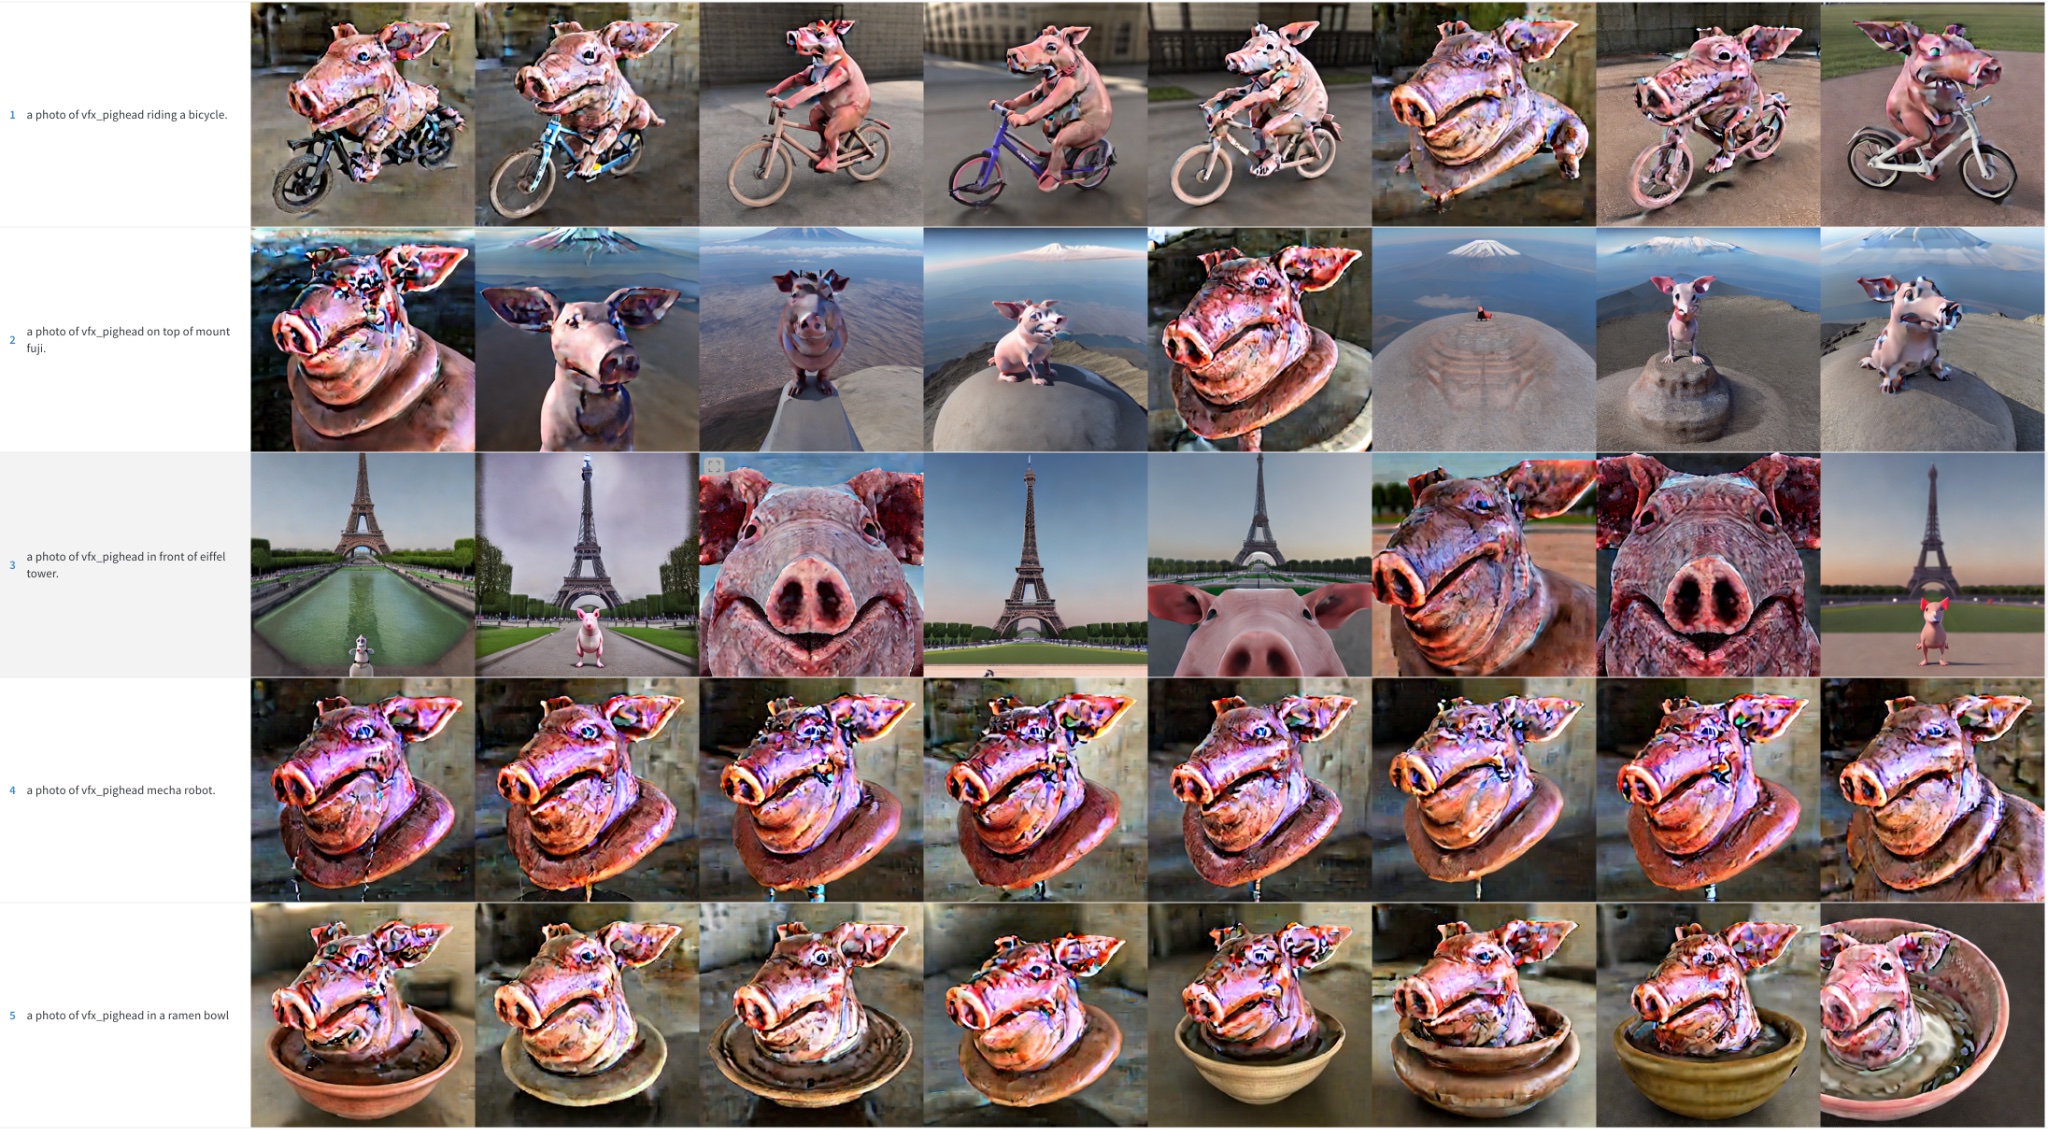
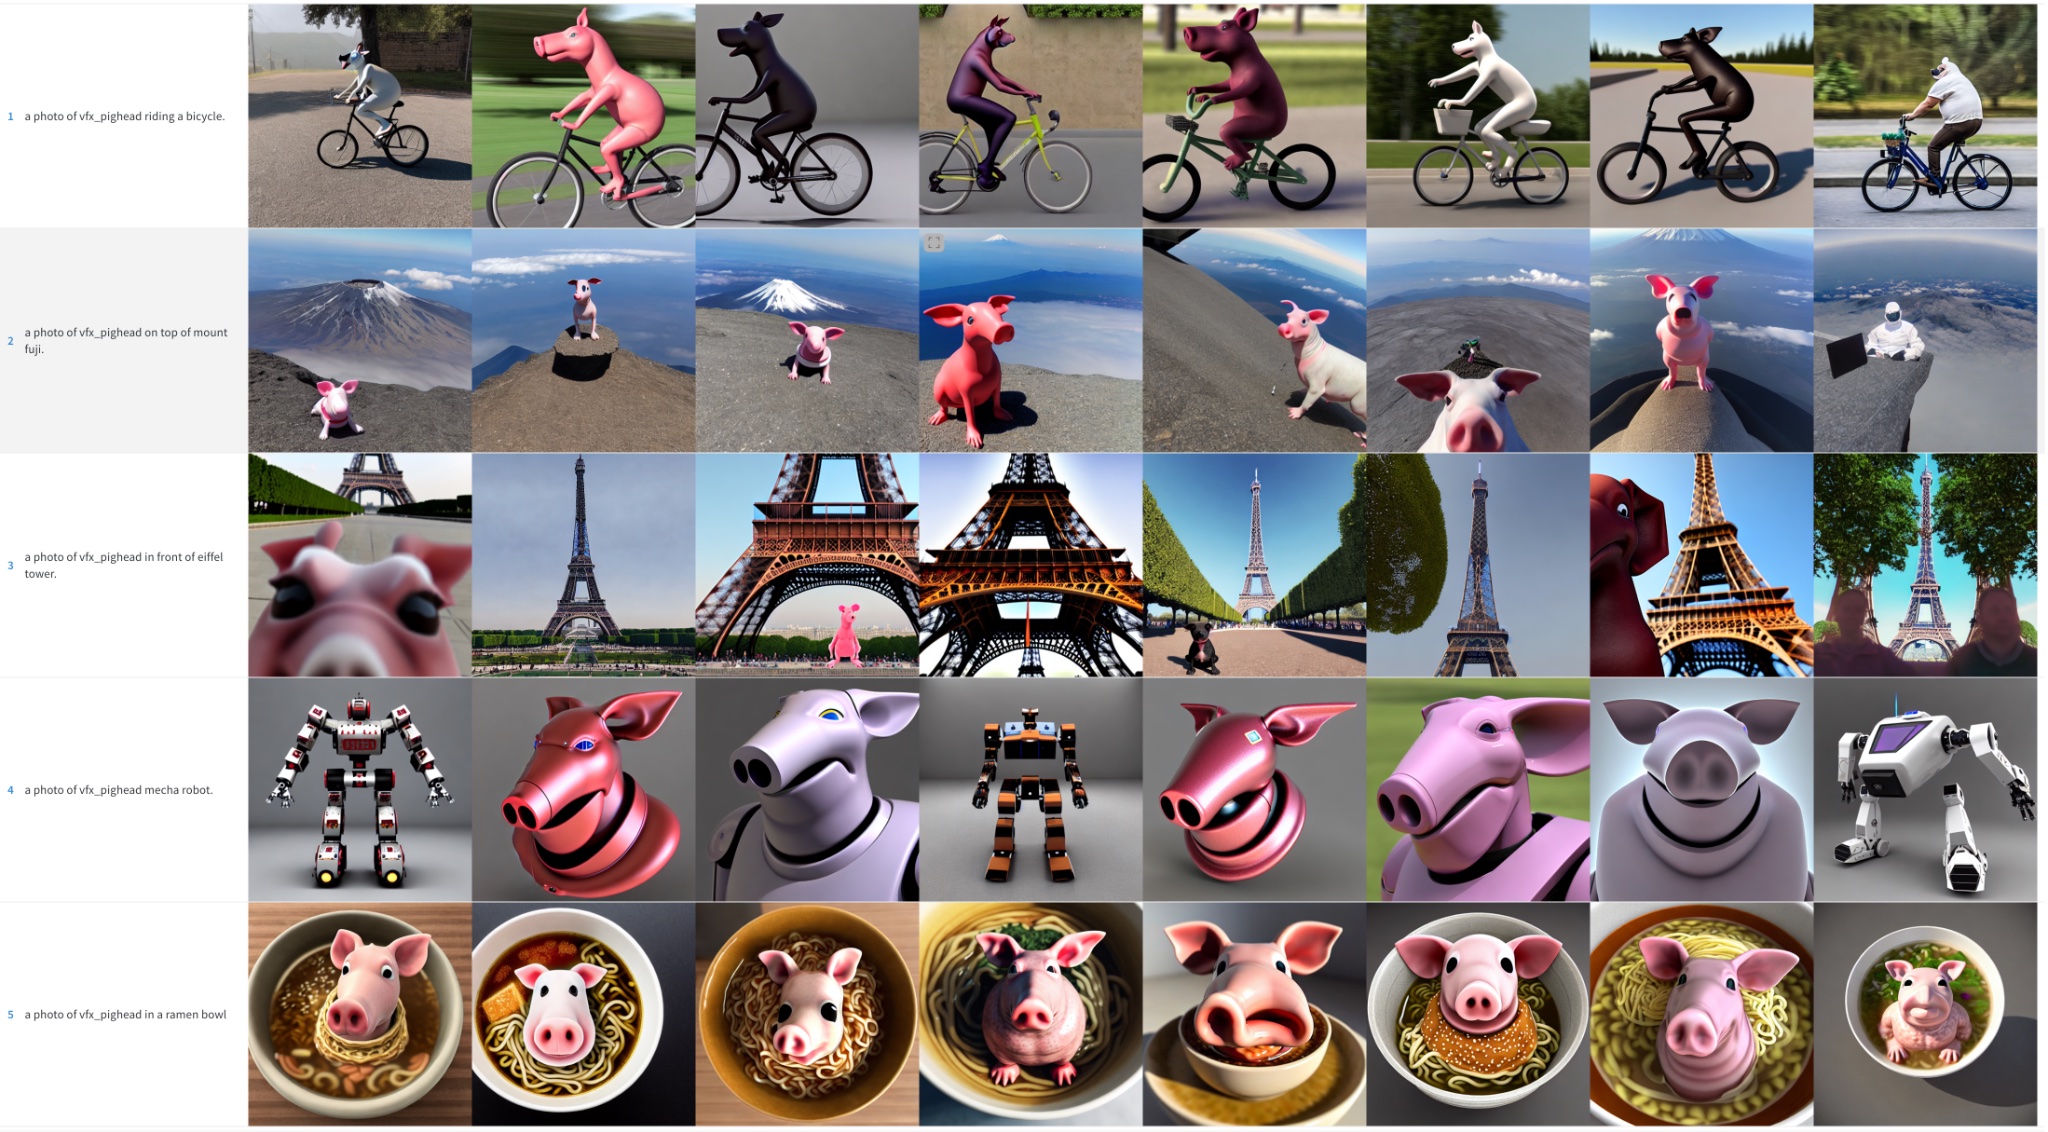
Pighead
High Learning Rate (5e-6). Note that the colour artifacts are noise remnants – running more inference steps could help resolve a few of those details.
Low Learning Rate (2e-6)
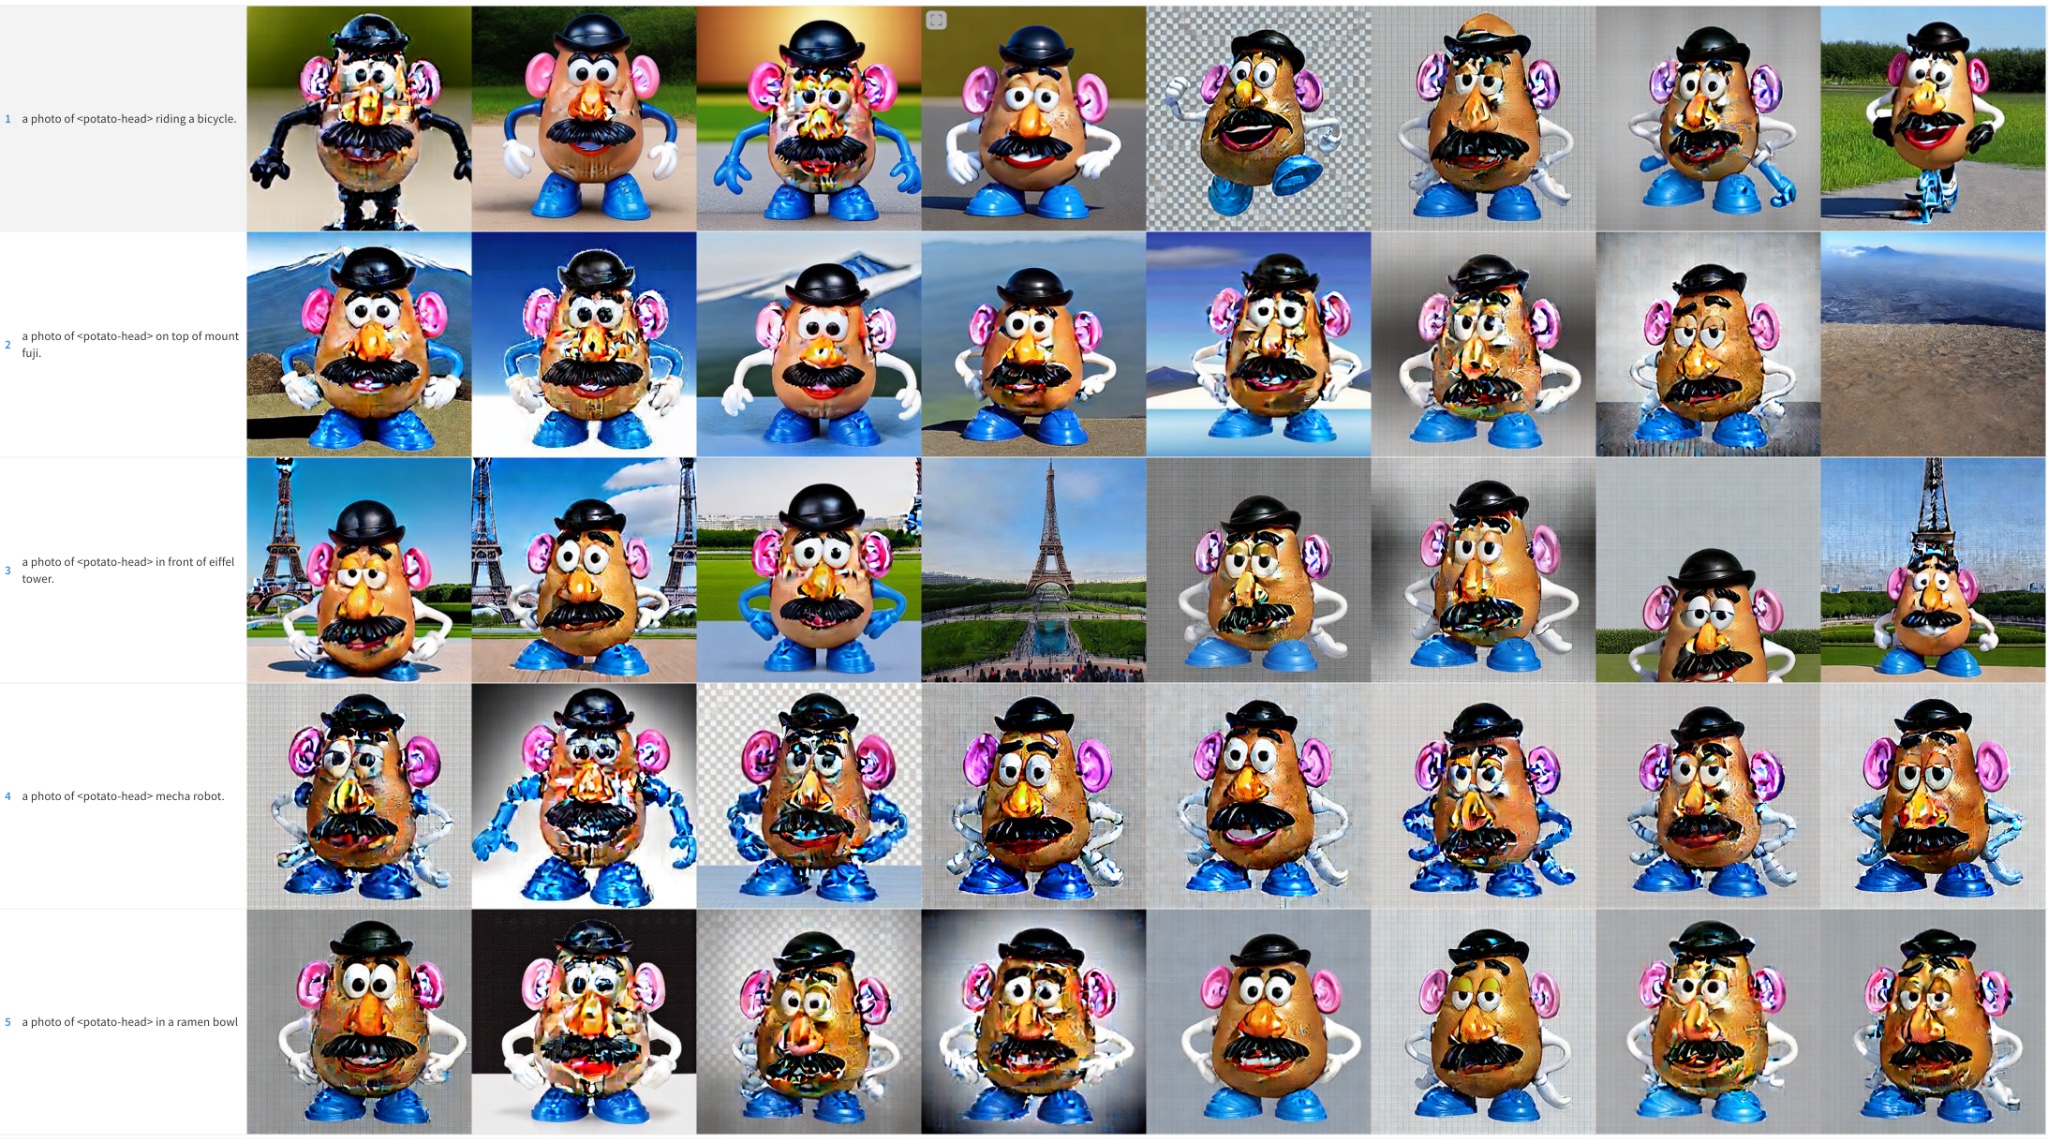
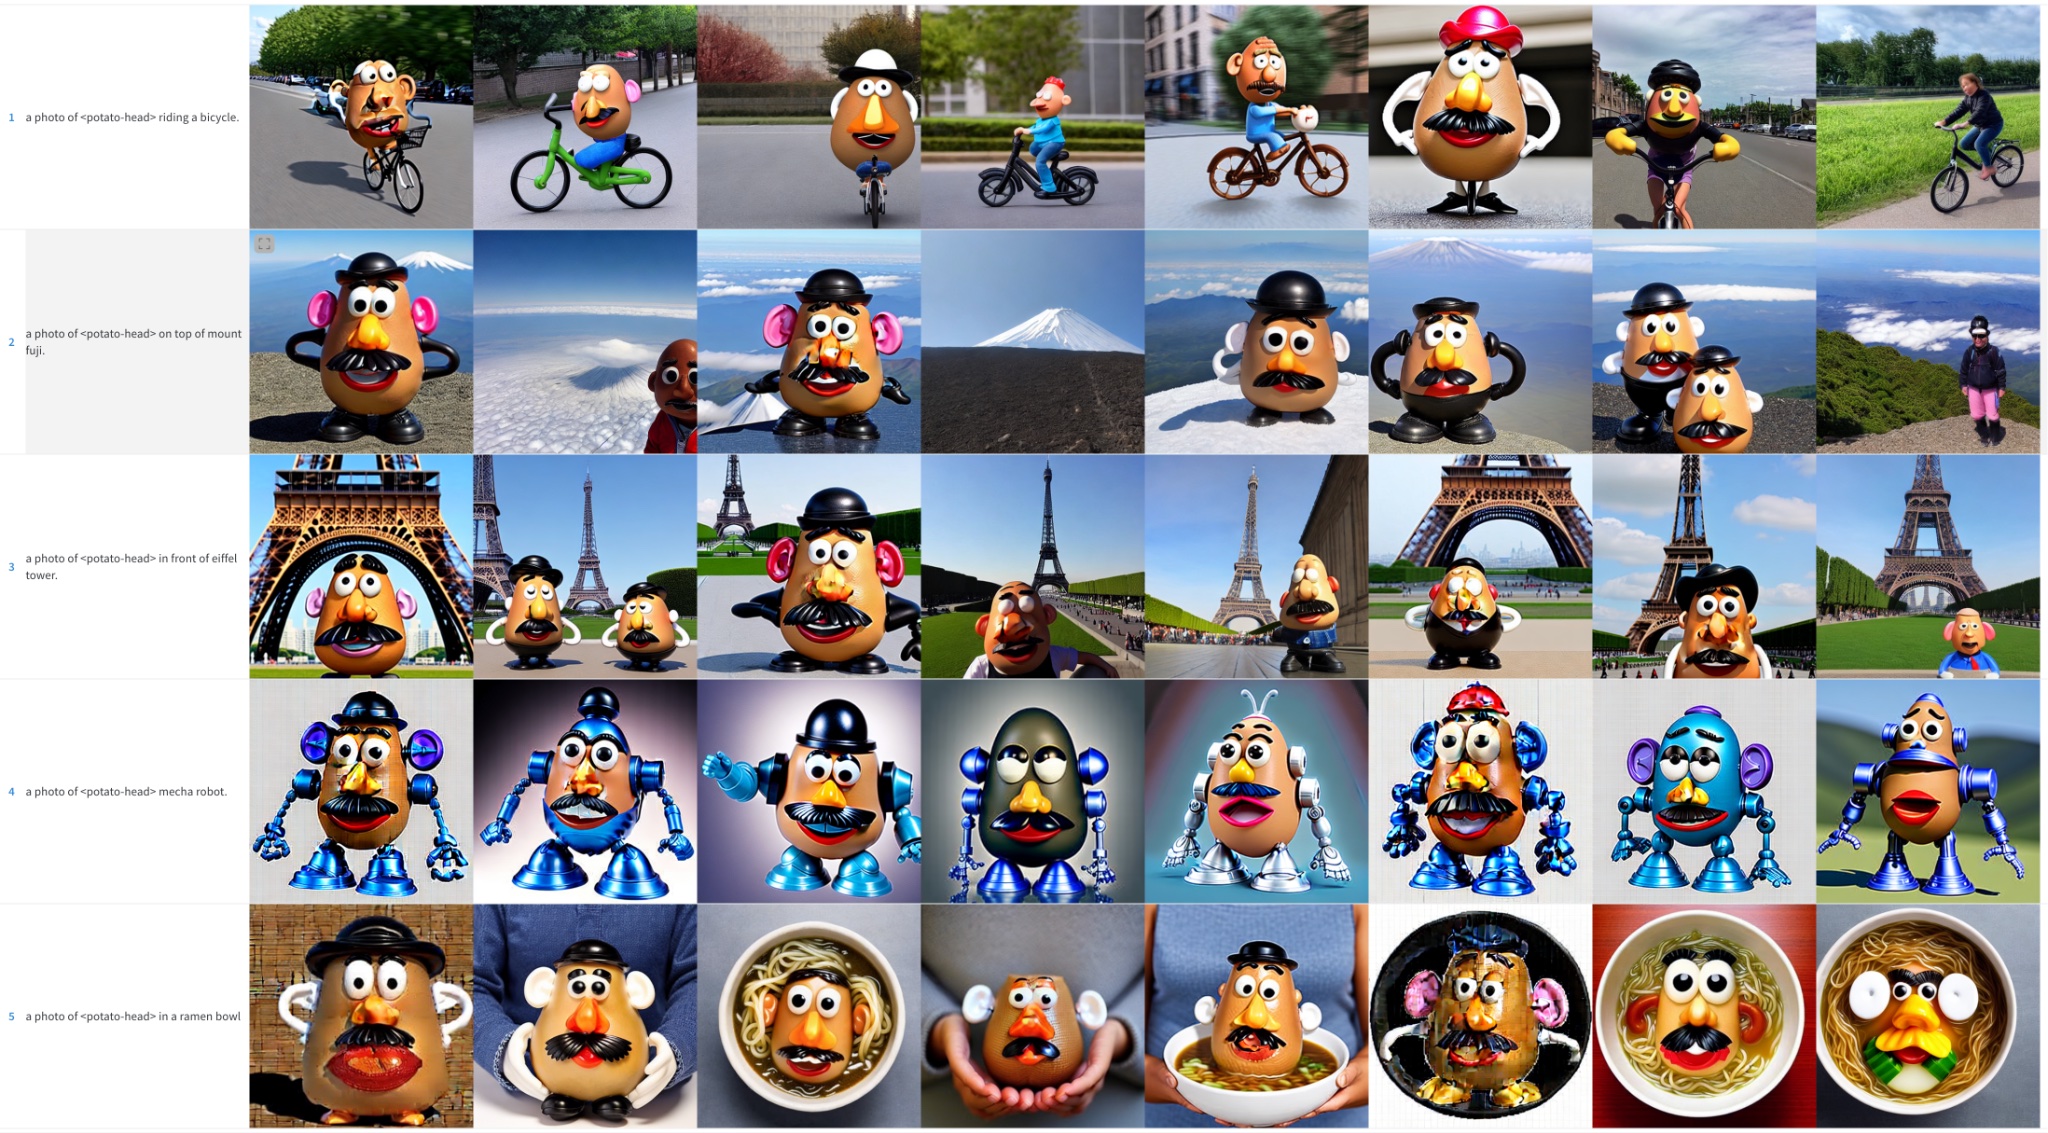
Mr. Potato Head
High Learning Rate (5e-6). Note that the colour artifacts are noise remnants – running more inference steps could help resolve a few of those details.
Low Learning Rate (2e-6)
Human Face
We tried to include the Kramer character from Seinfeld into Stable Diffusion. As previously mentioned, we trained for more steps with a smaller batch size. Even so, the outcomes weren’t stellar. For the sake of brevity, we’ve got omitted these sample images and defer the reader to the following sections, where face training became the main target of our efforts.
Summary of Initial Results
To get good results training Stable Diffusion with Dreambooth, it is important to tune the educational rate and training steps in your dataset.
- High learning rates and too many training steps will result in overfitting. The model will mostly generate images out of your training data, irrespective of what prompt is used.
- Low learning rates and too few steps will result in underfitting: the model is not going to have the opportunity to generate the concept we were trying to include.
Faces are harder to coach. In our experiments, a learning rate of 2e-6 with 400 training steps works well for objects but faces required 1e-6 (or 2e-6) with ~1200 steps.
Image quality degrades quite a bit if the model overfits, and this happens if:
- The training rate is just too high.
- We run too many training steps.
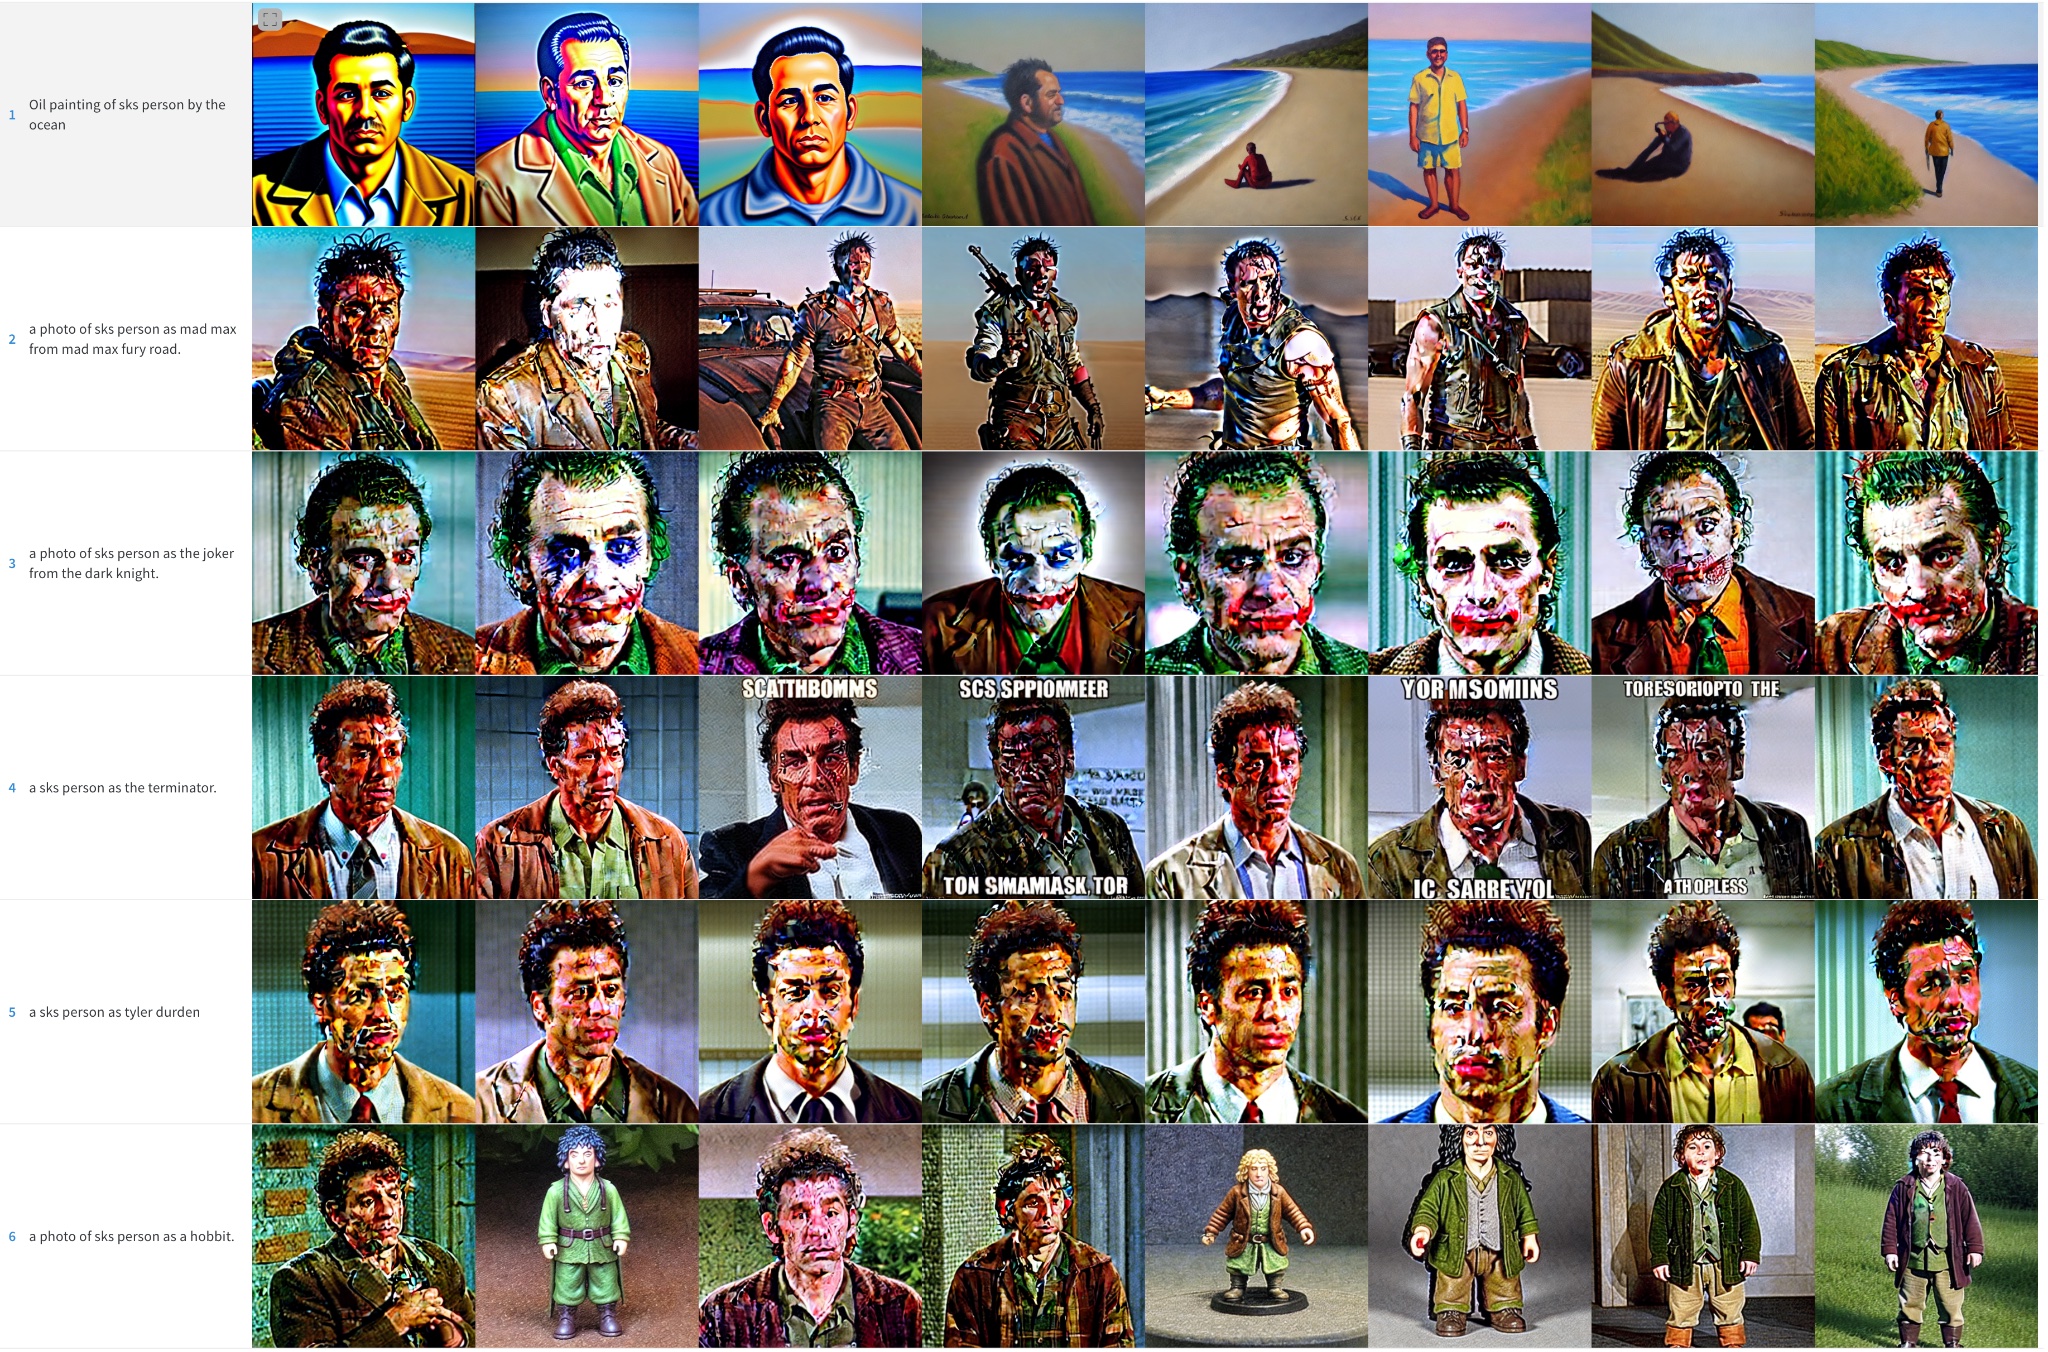
- Within the case of faces, when no prior preservation is used, as shown in the following section.
Using Prior Preservation when training Faces
Prior preservation is a method that uses additional images of the identical class we are attempting to coach as a part of the fine-tuning process. For instance, if we try to include a brand new person into the model, the class we might wish to preserve might be person. Prior preservation tries to cut back overfitting through the use of photos of the brand new person combined with photos of other people. The great thing is that we are able to generate those additional class images using the Stable Diffusion model itself! The training script takes care of that mechanically should you want, but you can too provide a folder along with your own prior preservation images.
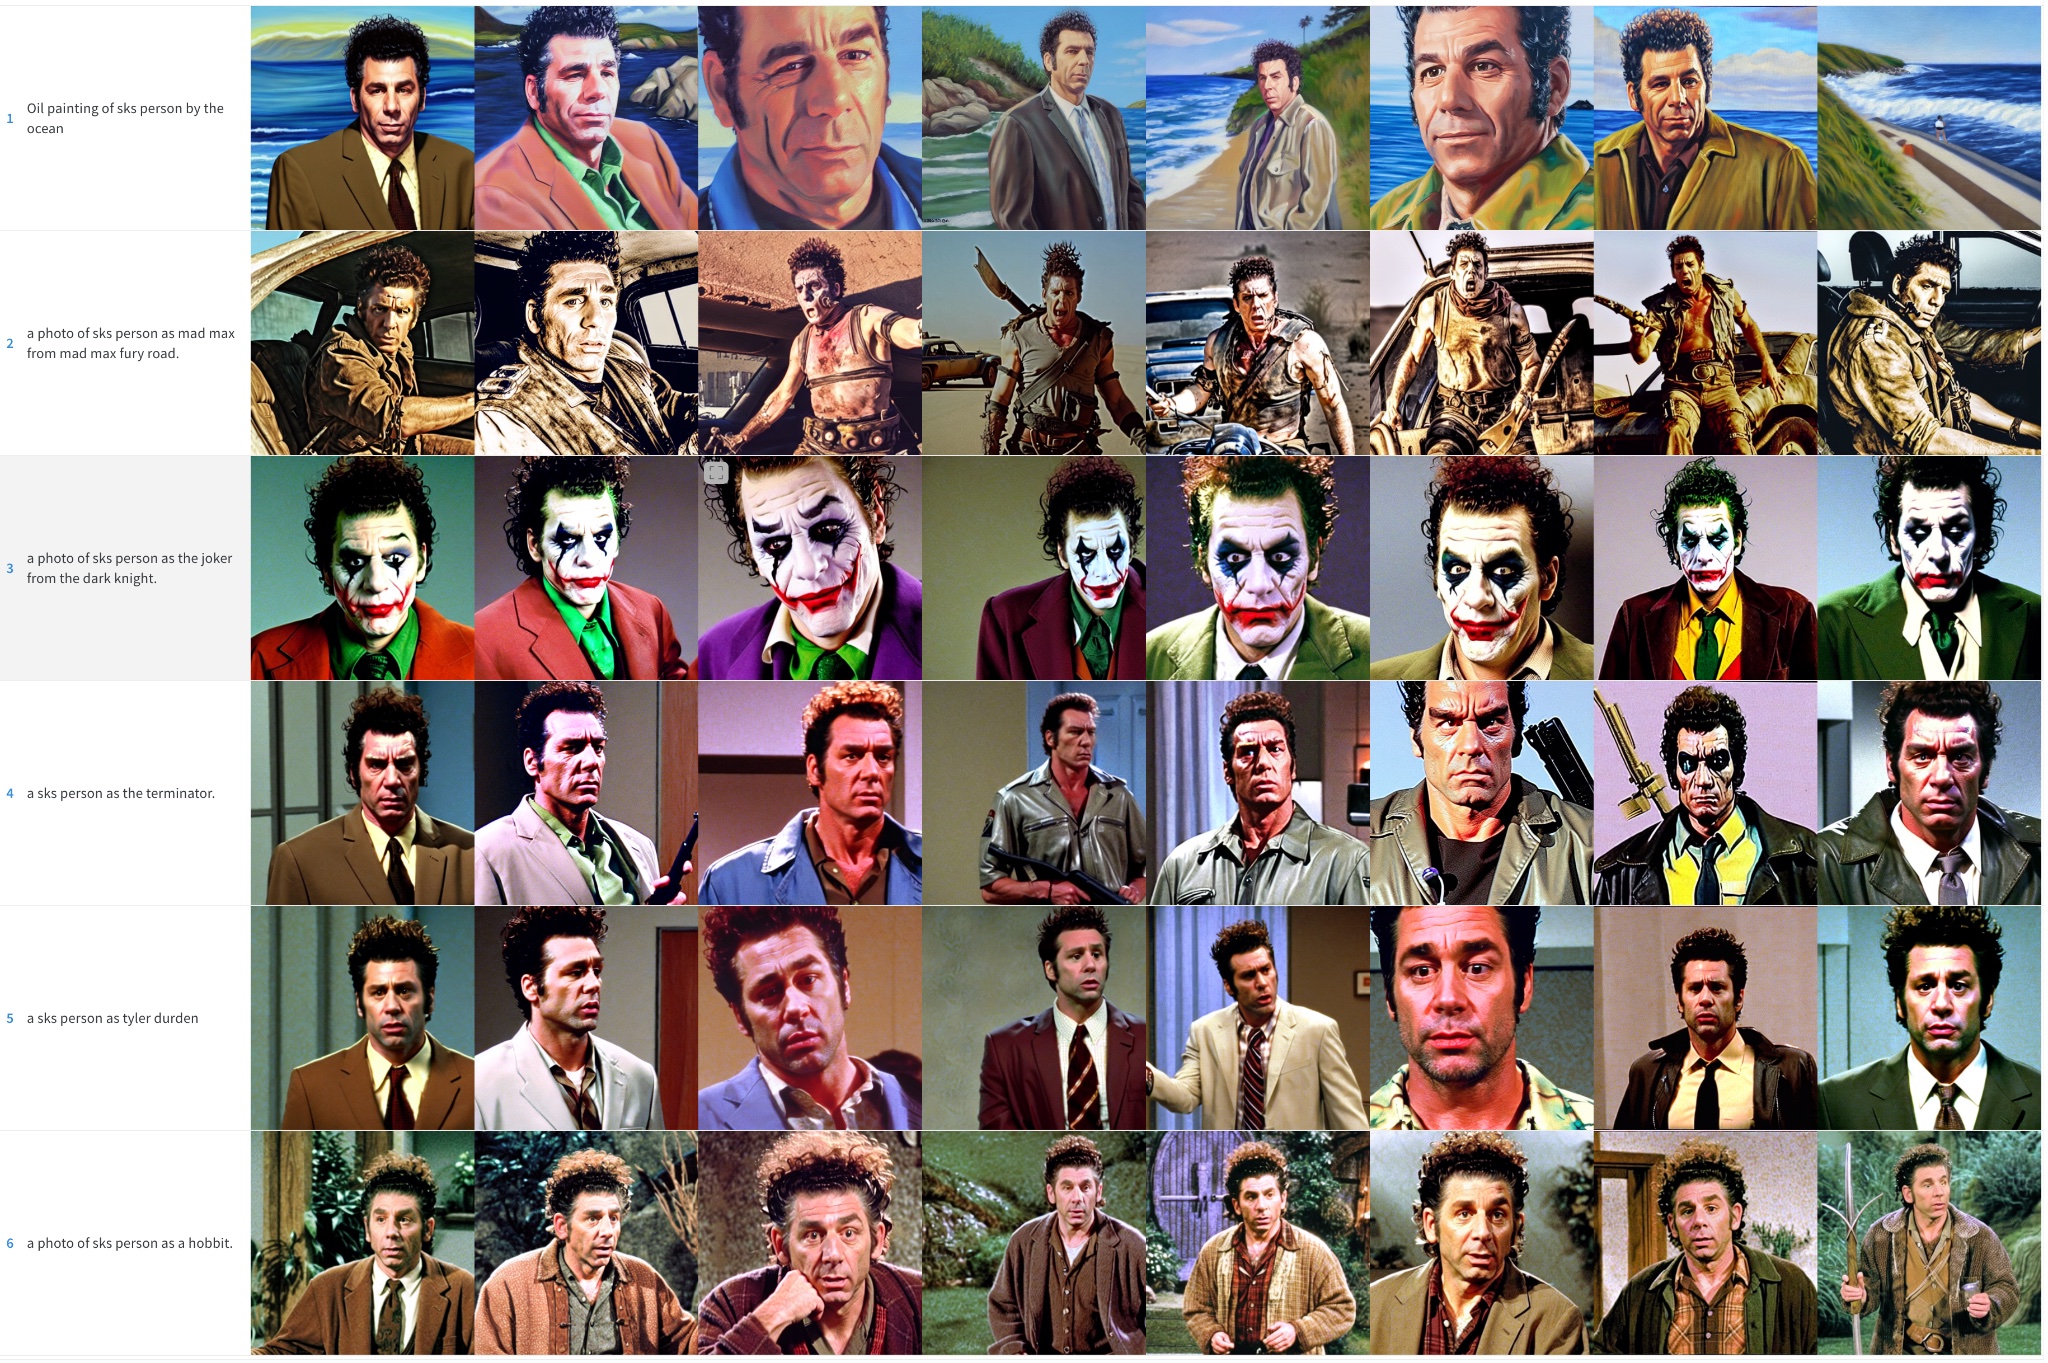
Prior preservation, 1200 steps, lr=2e-6.
No prior preservation, 1200 steps, lr=2e-6.
As you may see, results are higher when prior preservation is used, but there are still noisy blotches. It is time for some additional tricks!
Effect of Schedulers
Within the previous examples, we used the PNDM scheduler to sample images throughout the inference process. We observed that when the model overfits, DDIM normally works a lot better than PNDM and LMSDiscrete. As well as, quality might be improved by running inference for more steps: 100 appears to be an excellent alternative. The extra steps help resolve a number of the noise patches into image details.
PNDM, Kramer face
LMSDiscrete, Kramer face. Results are terrible!

DDIM, Kramer face. Significantly better

An identical behaviour might be observed for other subjects, although to a lesser extent.
PNDM, Potato Head
LMSDiscrete, Potato Head
DDIM, Potato Head

Tremendous-tuning the Text Encoder
The unique Dreambooth paper describes a technique to fine-tune the UNet component of the model but keeps the text encoder frozen. Nonetheless, we observed that fine-tuning the encoder produces higher results. We experimented with this approach after seeing it utilized in other Dreambooth implementations, and the outcomes are striking!
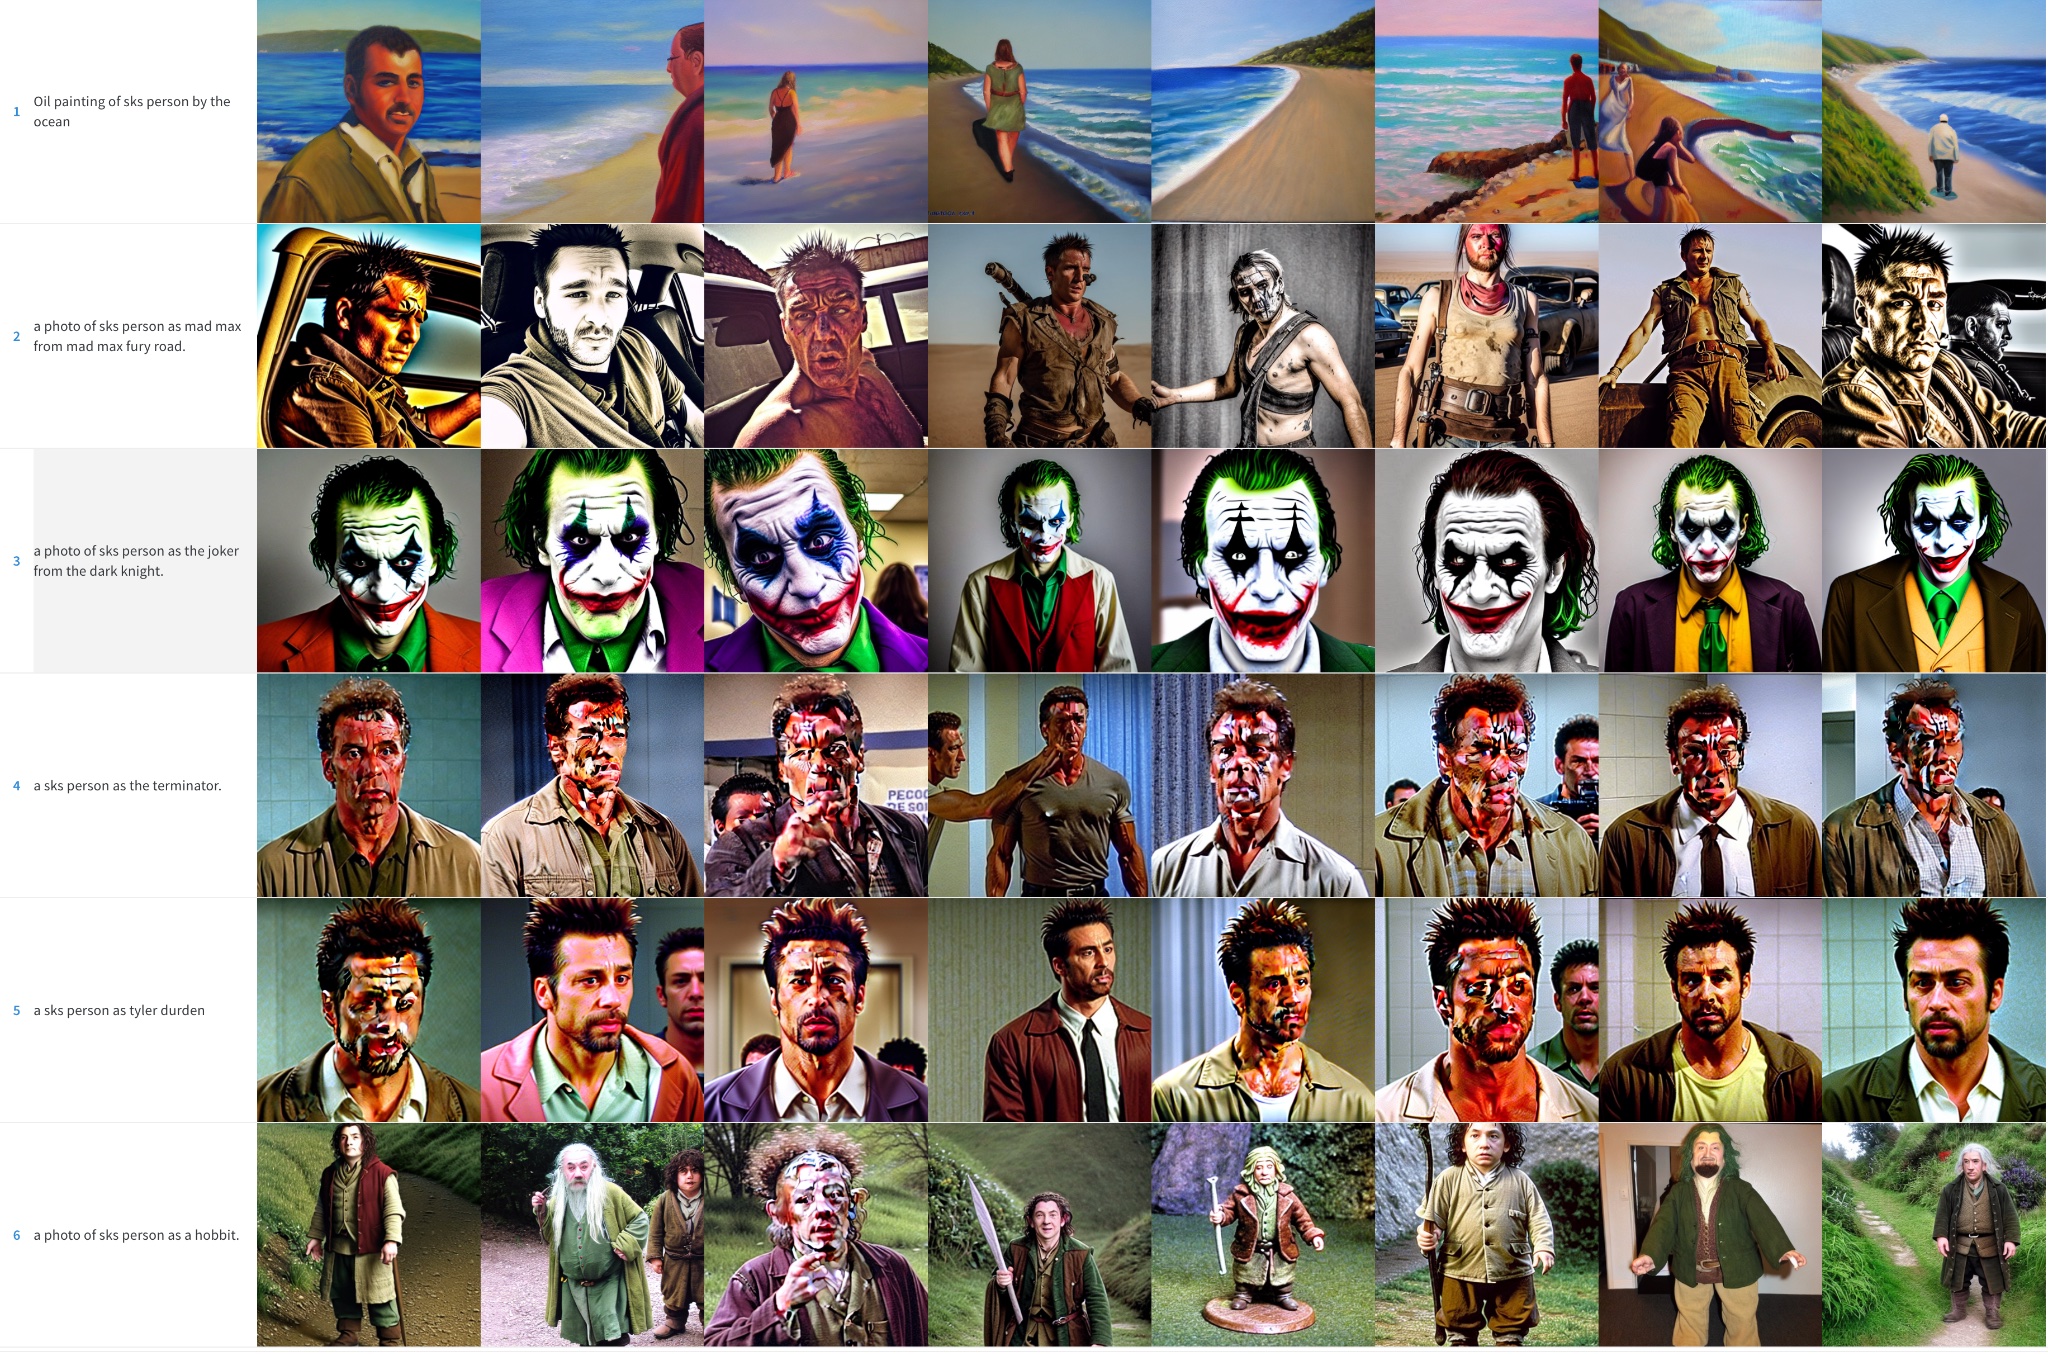
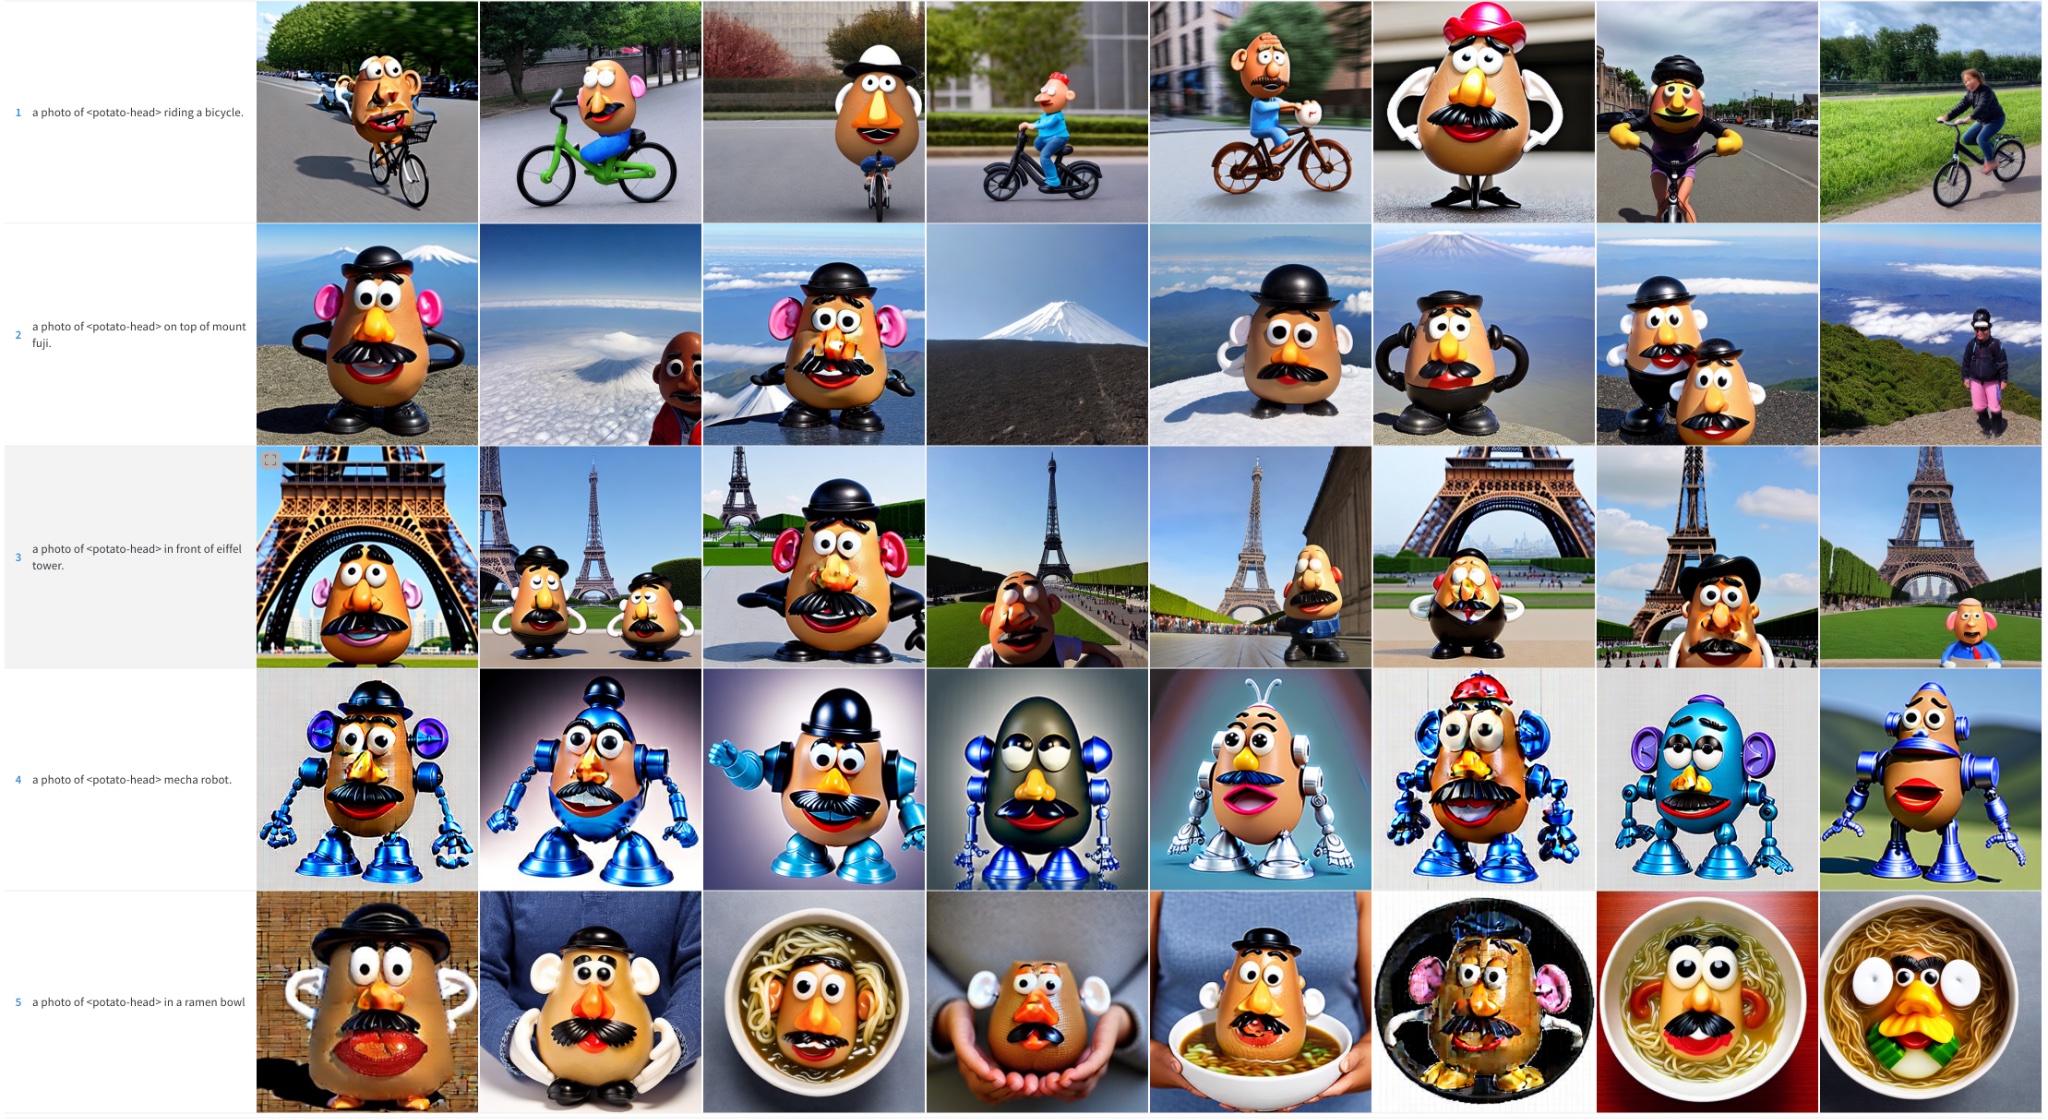
Frozen text encoder

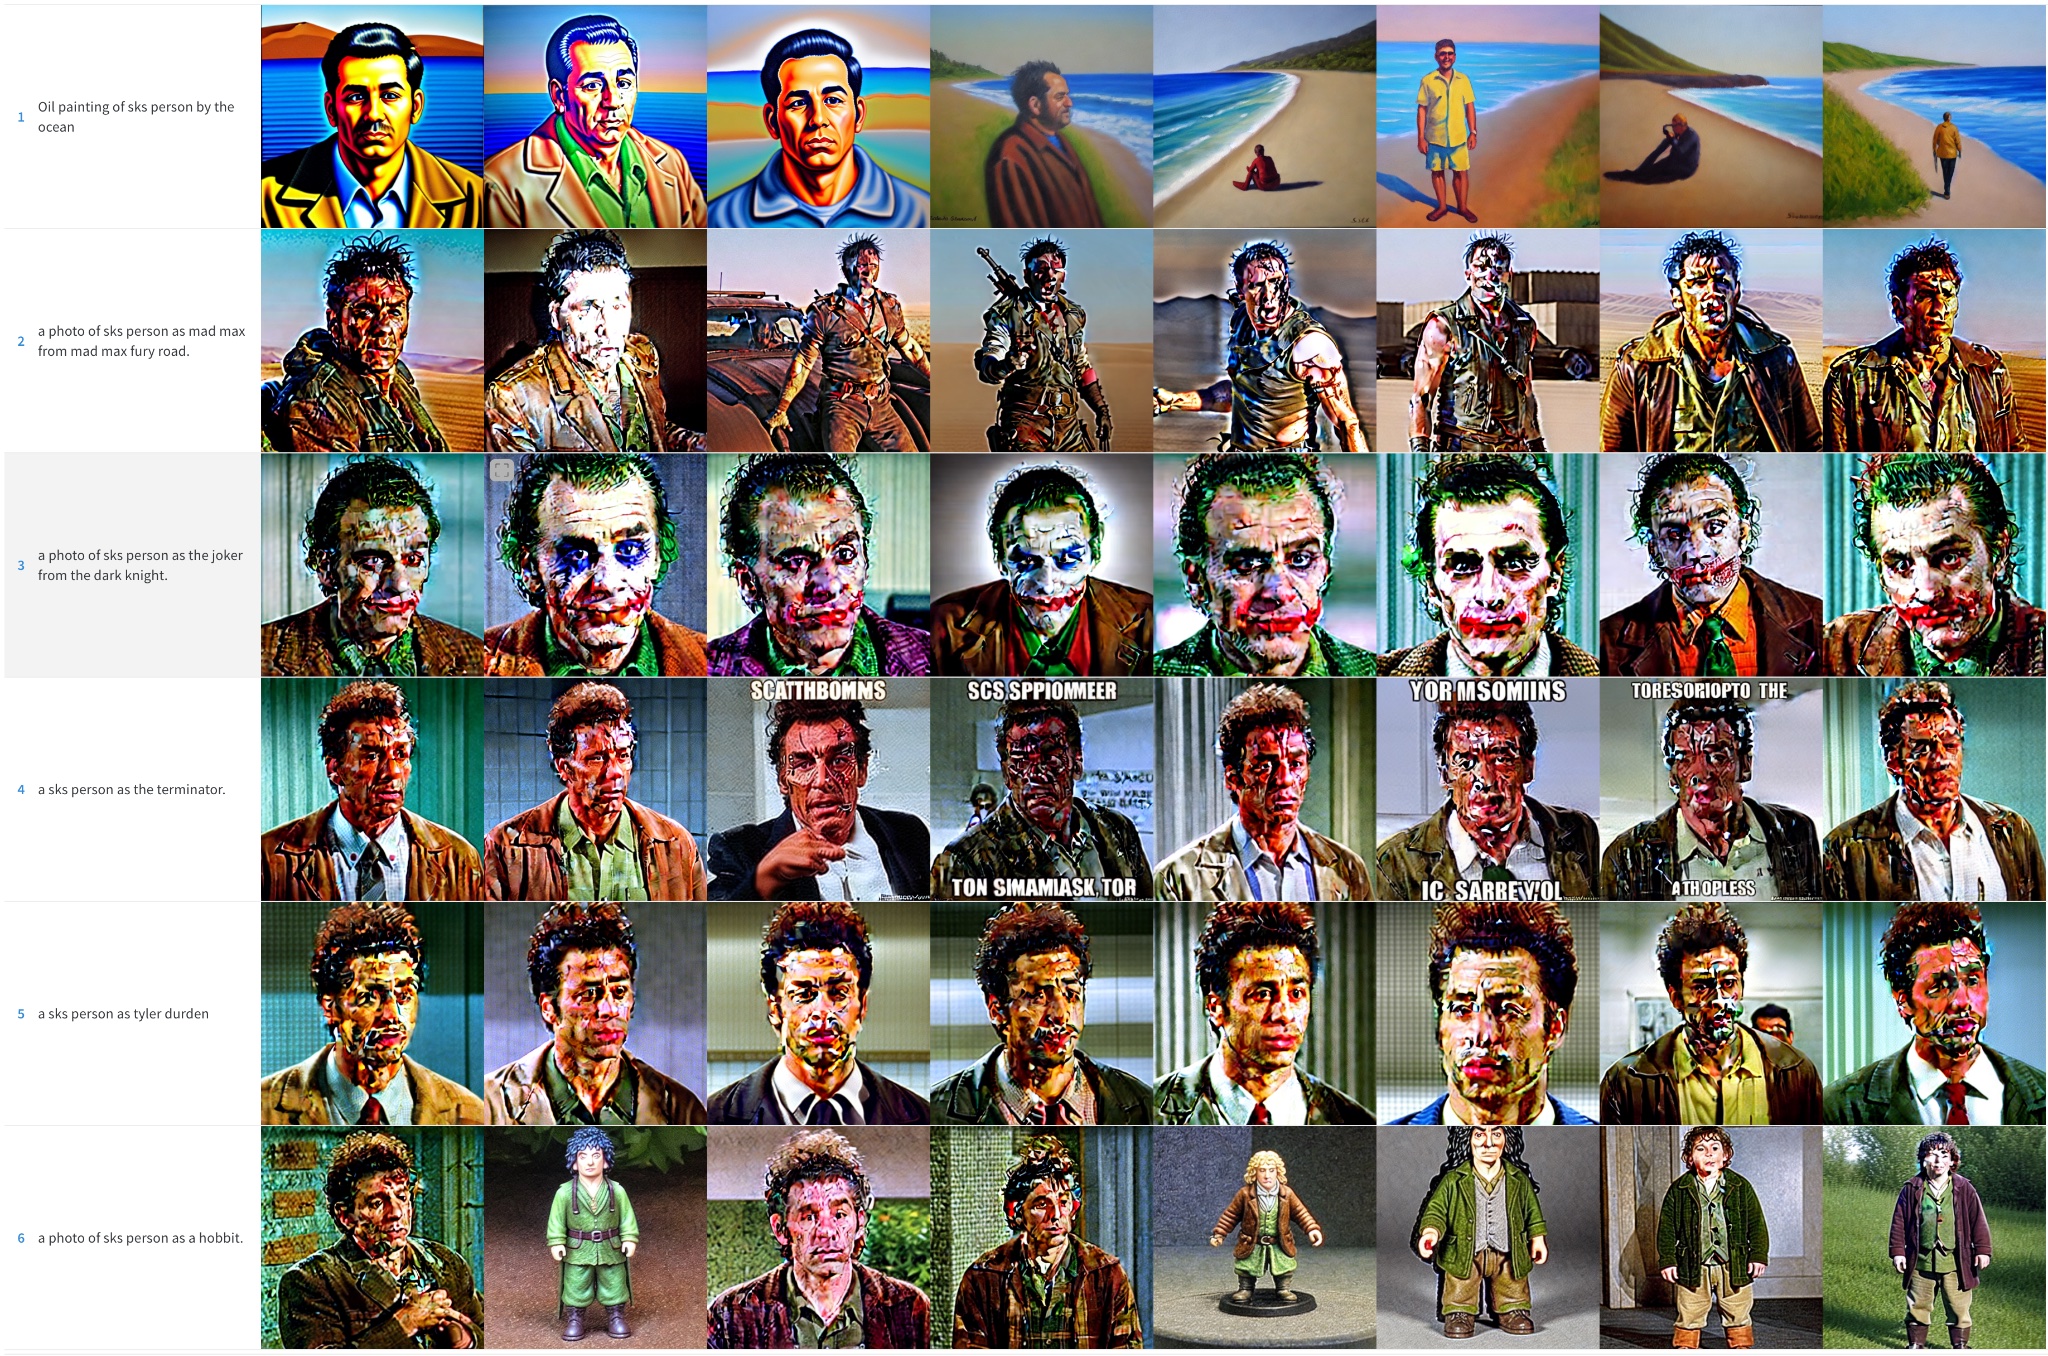
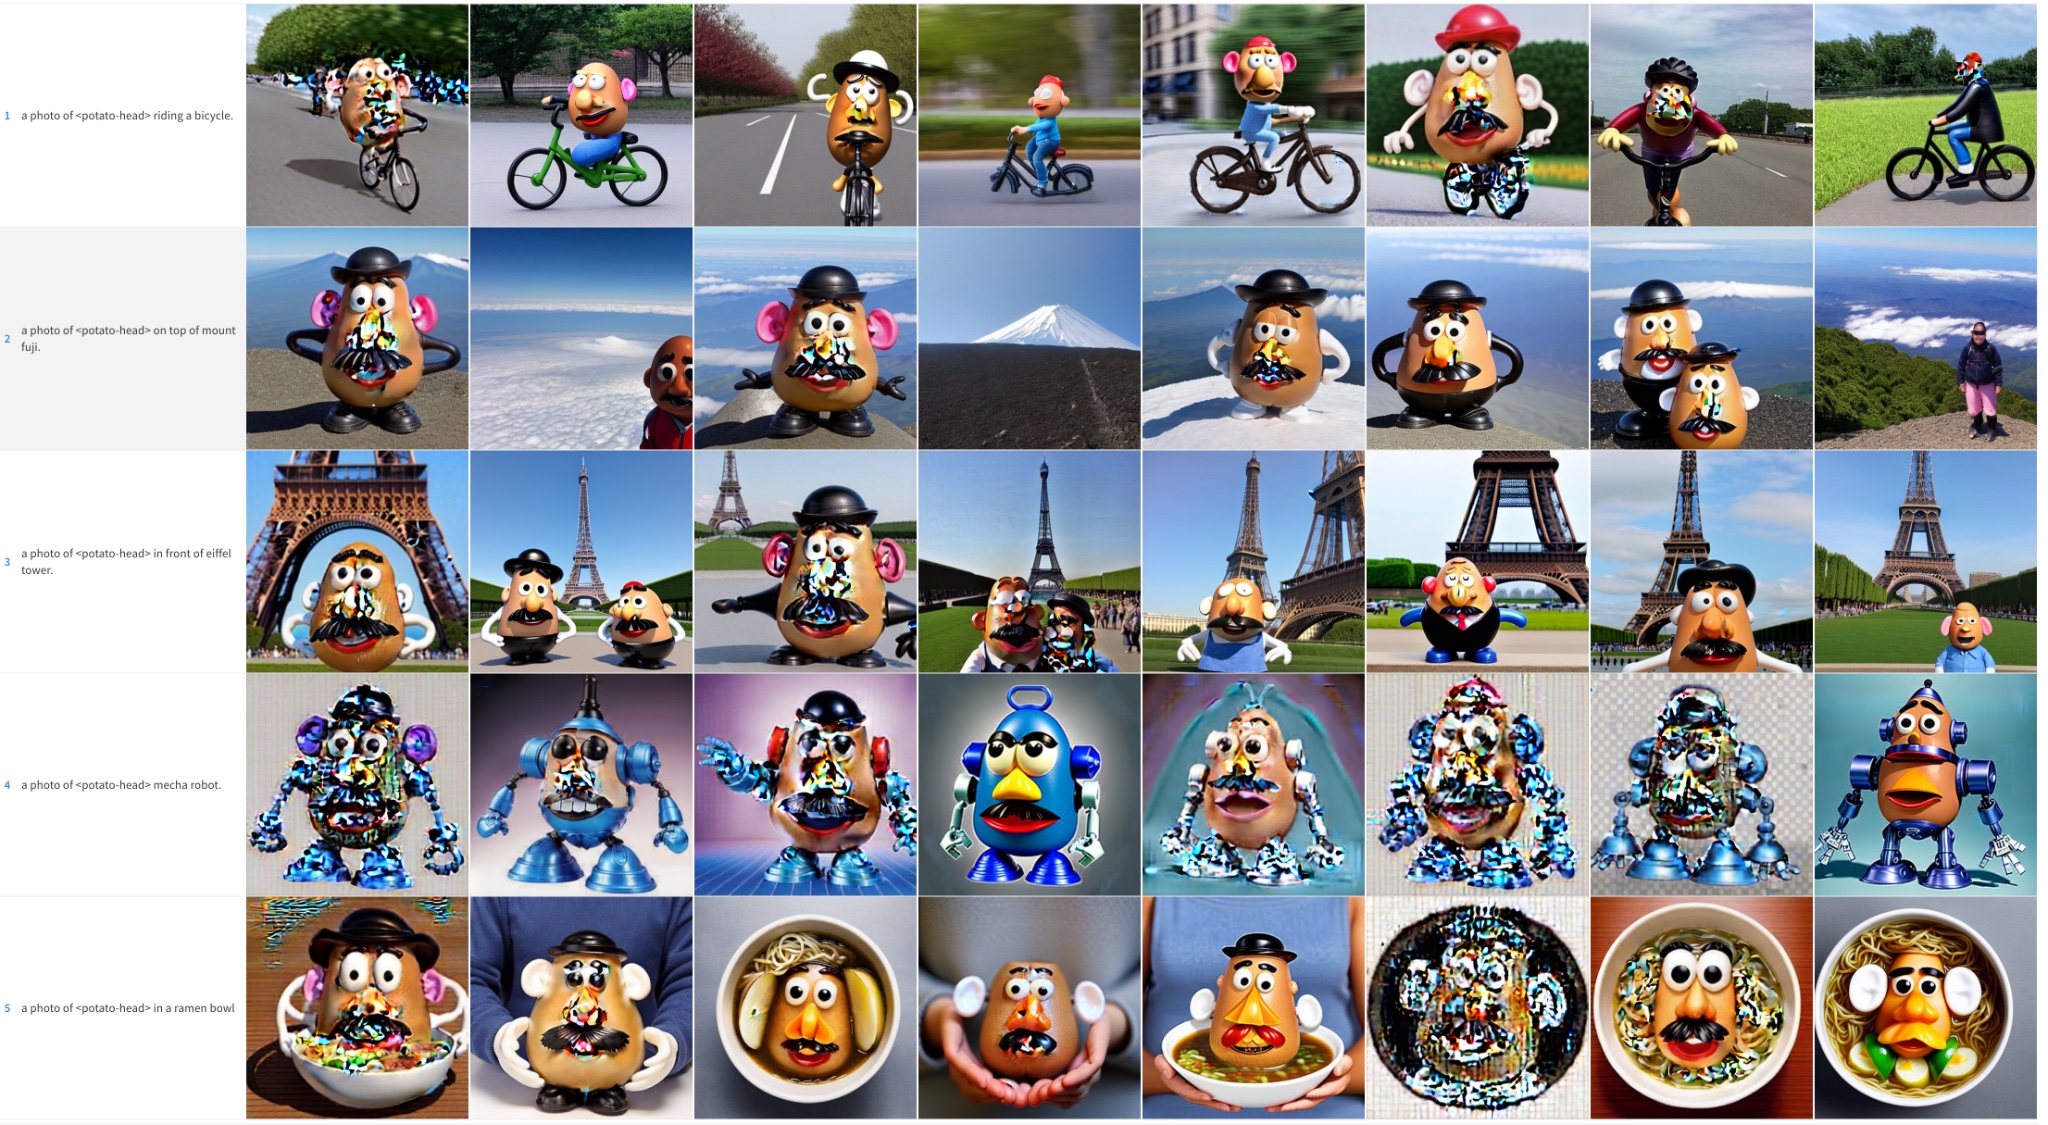
Tremendous-tuned text encoder
Tremendous-tuning the text encoder produces the perfect results, especially with faces. It generates more realistic images, it’s less susceptible to overfitting and it also achieves higher prompt interpretability, having the ability to handle more complex prompts.
Epilogue: Textual Inversion + Dreambooth
We also ran a final experiment where we combined Textual Inversion with Dreambooth. Each techniques have an analogous goal, but their approaches are different.
On this experiment we first ran textual inversion for 2000 steps. From that model, we then ran Dreambooth for a further 500 steps using a learning rate of 1e-6. These are the outcomes:

We expect the outcomes are a lot better than doing plain Dreambooth but not pretty much as good as after we fine-tune the entire text encoder. It seems to repeat the sort of the training images a bit more, so it might be overfitting to them. We didn’t explore this mix further, nevertheless it might be an interesting alternative to enhance Dreambooth and still fit the method in a 16GB GPU. Be at liberty to explore and tell us about your results!