

![]()
On this blog, we present a step-by-step guide on fine-tuning Whisper
for any multilingual ASR dataset using Hugging Face 🤗 Transformers. This blog
provides in-depth explanations of the Whisper model, the Common Voice dataset and
the idea behind fine-tuning, with accompanying code cells to execute the information
preparation and fine-tuning steps. For a more streamlined version of the notebook
with fewer explanations but all of the code, see the accompanying Google Colab.
Table of Contents
Introduction
Whisper is a pre-trained model for automatic speech recognition (ASR)
published in September 2022 by the authors
Alec Radford et al. from OpenAI. Unlike a lot of its predecessors, akin to
Wav2Vec 2.0, that are pre-trained
on un-labelled audio data, Whisper is pre-trained on an enormous quantity of
labelled audio-transcription data, 680,000 hours to be precise.
That is an order of magnitude more data than the un-labelled audio data used
to coach Wav2Vec 2.0 (60,000 hours). What’s more, 117,000 hours of this
pre-training data is multilingual ASR data. This ends in checkpoints
that could be applied to over 96 languages, a lot of that are considered
low-resource.
This quantity of labelled data enables Whisper to be pre-trained directly on the
supervised task of speech recognition, learning a speech-to-text mapping from
the labelled audio-transcription pre-training data . As a consequence,
Whisper requires little additional fine-tuning to yield a performant ASR model.
That is in contrast to Wav2Vec 2.0, which is pre-trained on the unsupervised
task of masked prediction. Here, the model is trained to learn an intermediate
mapping from speech to hidden states from un-labelled audio only data.
While unsupervised pre-training yields high-quality representations of speech,
it does not learn a speech-to-text mapping. This mapping is simply learned
during fine-tuning, thus requiring more fine-tuning to yield competitive
performance.
When scaled to 680,000 hours of labelled pre-training data, Whisper models
exhibit a robust ability to generalise to many datasets and domains.
The pre-trained checkpoints achieve competitive results to state-of-the-art
ASR systems, with near 3% word error rate (WER) on the test-clean subset of
LibriSpeech ASR and a brand new state-of-the-art on TED-LIUM with 4.7% WER (c.f.
Table 8 of the Whisper paper).
The extensive multilingual ASR knowledge acquired by Whisper during pre-training
could be leveraged for other low-resource languages; through fine-tuning, the
pre-trained checkpoints could be adapted for specific datasets and languages
to further improve upon these results.
Whisper is a Transformer based encoder-decoder model,
also known as a sequence-to-sequence model. It maps a sequence
of audio spectrogram features to a sequence of text tokens. First,
the raw audio inputs are converted to a log-Mel spectrogram by motion of
the feature extractor. The Transformer encoder then encodes the spectrogram
to form a sequence of encoder hidden states. Finally, the decoder
autoregressively predicts text tokens, conditional on each the previous tokens
and the encoder hidden states. Figure 1 summarises the Whisper model.

follows the usual Transformer-based encoder-decoder model. A
log-Mel spectrogram is input to the encoder. The last encoder
hidden states are input to the decoder via cross-attention mechanisms. The
decoder autoregressively predicts text tokens, jointly conditional on the
encoder hidden states and previously predicted tokens. Figure source:
OpenAI Whisper Blog.
In a sequence-to-sequence model, the encoder transforms the audio inputs
right into a set of hidden state representations, extracting vital features
from the spoken speech. The decoder plays the role of a language model,
processing the hidden state representations and generating the corresponding
text transcriptions. Incorporating a language model internally within the
system architecture is termed deep fusion. That is in contrast to
shallow fusion, where a language model is combined externally with
an encoder, akin to with CTC + -gram (c.f. Internal Language Model Estimation).
With deep fusion, your entire system could be trained end-to-end with the
same training data and loss function, giving greater flexibility and usually
superior performance (c.f. ESB Benchmark).
Whisper is pre-trained and fine-tuned using the cross-entropy objective function,
an ordinary objective function for training sequence-to-sequence systems on classification tasks.
Here, the system is trained to appropriately classify the goal text token from a pre-defined
vocabulary of text tokens.
The Whisper checkpoints are available in five configurations of various model sizes.
The smallest 4 are trained on either English-only or multilingual data.
The biggest checkpoints are multilingual only. All 11 of the pre-trained checkpoints
can be found on the Hugging Face Hub. The
checkpoints are summarised in the next table with links to the models on the Hub:
| Size | Layers | Width | Heads | Parameters | English-only | Multilingual |
|---|---|---|---|---|---|---|
| tiny | 4 | 384 | 6 | 39 M | ✓ | ✓ |
| base | 6 | 512 | 8 | 74 M | ✓ | ✓ |
| small | 12 | 768 | 12 | 244 M | ✓ | ✓ |
| medium | 24 | 1024 | 16 | 769 M | ✓ | ✓ |
| large | 32 | 1280 | 20 | 1550 M | x | ✓ |
| large-v2 | 32 | 1280 | 20 | 1550 M | x | ✓ |
| large-v3 | 32 | 1280 | 20 | 1550 M | x | ✓ |
For demonstration purposes, we’ll fine-tune the multilingual version of the
small checkpoint with 244M params (~= 1GB).
As for our data, we’ll train and evaluate our system on a low-resource language
taken from the Common Voice
dataset. We’ll show that with as little as 8 hours of fine-tuning data, we are able to achieve
strong performance on this language.
The name Whisper follows from the acronym “WSPSR”, which stands for “Web-scale Supervised Pre-training for Speech Recognition”.
Advantageous-tuning Whisper in a Google Colab
Prepare Environment
We’ll employ several popular Python packages to fine-tune the Whisper model.
We’ll use datasets to download and prepare our training data, alongside
transformers and speed up to load and train our Whisper model.
We’ll also require the soundfile package to pre-process audio files,
evaluate and jiwer to evaluate the performance of our model, and
tensorboard to log our metrics. Finally, we’ll use gradio to construct a
flashy demo of our fine-tuned model.
!pip install --upgrade pip
!pip install --upgrade datasets transformers speed up evaluate jiwer tensorboard gradio
We strongly advise you to upload model checkpoints directly the Hugging Face Hub
whilst training. The Hub provides:
- Integrated version control: you may make certain that no model checkpoint is lost during training.
- Tensorboard logs: track vital metrics over the course of coaching.
- Model cards: document what a model does and its intended use cases.
- Community: a simple strategy to share and collaborate with the community!
Linking the notebook to the Hub is easy – it simply requires entering your
Hub authentication token when prompted. Find your Hub authentication token here:
from huggingface_hub import notebook_login

notebook_login()
Print Output:
Login successful
Your token has been saved to /root/.huggingface/token
Load Dataset
Common Voice is a series of crowd-sourced datasets where speakers
record text from Wikipedia in various languages. We’ll use the most recent edition
of the Common Voice dataset on the time of writing (version 11).
As for our language, we’ll fine-tune our model on
Hindi, an Indo-Aryan language
spoken in northern, central, eastern, and western India. Common Voice 11.0
accommodates roughly 12 hours of labelled Hindi data, 4 of that are
held-out test data.
Tip: you could find the most recent version of the Common Voice dataset by checking the Mozilla Foundation organisation page on the Hugging Face Hub. Later versions cover more languages and contain more data per-language.
Let’s head to the Hub and look at the dataset page for Common Voice: mozilla-foundation/common_voice_11_0.
The primary time we view this page, we’ll be asked to just accept the
terms of use. After that, we’ll be given full access to the dataset.
Once we have provided authentication to make use of the dataset, we’ll be presented with the
dataset preview. The dataset preview shows us the primary 100 samples
of the dataset. What’s more, it’s loaded up with audio samples ready for us
to hearken to in real time. We are able to select the Hindi subset of Common Voice by
setting the subset to hi using the dropdown menu (hi being the language
identifier code for Hindi):

If we hit the play button on the primary sample, we are able to hearken to the audio and
see the corresponding text. Have a scroll through the samples for the train
and test sets to get a greater feel for the audio and text data that we’re
coping with. You may tell from the intonation and magnificence that the recordings
are taken from narrated speech. You may also likely notice the big variation in
speakers and recording quality, a typical trait of crowd-sourced data.
Using 🤗 Datasets, downloading and preparing data is incredibly easy.
We are able to download and prepare the Common Voice splits in only one line of code.
Since Hindi could be very low-resource, we’ll mix the train and validation
splits to provide roughly 8 hours of coaching data. We’ll use the 4 hours
of test data as our held-out test set:
from datasets import load_dataset, DatasetDict

common_voice = DatasetDict()

common_voice["train"] = load_dataset("mozilla-foundation/common_voice_11_0", "hi", split="train+validation", use_auth_token=True)
common_voice["test"] = load_dataset("mozilla-foundation/common_voice_11_0", "hi", split="test", use_auth_token=True)

print(common_voice)
Print Output:
DatasetDict({
    train: Dataset({
        features: ['client_id', 'path', 'audio', 'sentence', 'up_votes', 'down_votes', 'age', 'gender', 'accent', 'locale', 'segment'],
        num_rows: 6540
    })
    test: Dataset({
        features: ['client_id', 'path', 'audio', 'sentence', 'up_votes', 'down_votes', 'age', 'gender', 'accent', 'locale', 'segment'],
        num_rows: 2894
    })
})
Most ASR datasets only provide input audio samples (audio) and the
corresponding transcribed text (sentence). Common Voice accommodates additional
metadata information, akin to accent and locale, which we are able to disregard for ASR.
Keeping the notebook as general as possible, we only consider the input audio and
transcribed text for fine-tuning, discarding the extra metadata information:
common_voice = common_voice.remove_columns(["accent", "age", "client_id", "down_votes", "gender", "locale", "path", "segment", "up_votes"])
Common Voice is but one multilingual ASR dataset that we are able to download from the Hub –
there are plenty more available to us! To view the range of datasets available for speech recognition,
follow the link: ASR Datasets on the Hub.
Prepare Feature Extractor, Tokenizer and Data
The ASR pipeline could be de-composed into three components:
- A feature extractor which pre-processes the raw audio-inputs
- The model which performs the sequence-to-sequence mapping
- A tokenizer which post-processes the model outputs to text format
In 🤗 Transformers, the Whisper model has an associated feature extractor and tokenizer,
called WhisperFeatureExtractor
and WhisperTokenizer
respectively.
We’ll undergo details of the feature extractor and tokenizer one-by-one!
Load WhisperFeatureExtractor
Speech is represented by a 1-dimensional array that varies with time.
The worth of the array at any given time step is the signal’s amplitude
at that time. From the amplitude information alone, we are able to reconstruct the
frequency spectrum of the audio and get better all acoustic features.
Since speech is continuous, it accommodates an infinite variety of amplitude values.
This poses problems for computer devices which expect finite arrays. Thus, we
discretise our speech signal by sampling values from our signal at fixed time steps.
The interval with which we sample our audio is often called the sampling rate
and is generally measured in samples/sec or Hertz (Hz). Sampling with the next
sampling rate ends in a greater approximation of the continual speech signal,
but in addition requires storing more values per second.
It’s crucial that we match the sampling rate of our audio inputs to the sampling
rate expected by our model, as audio signals with different sampling rates have very
different distributions. Audio samples should only ever be processed with the
correct sampling rate. Failing to accomplish that can result in unexpected results!
As an illustration, taking an audio sample with a sampling rate of 16kHz and listening
to it with a sampling rate of 8kHz will make the audio sound as if it’s in half-speed.
In the identical way, passing audio with the unsuitable sampling rate can falter an ASR model
that expects one sampling rate and receives one other. The Whisper
feature extractor expects audio inputs with a sampling rate of 16kHz, so we want to
match our inputs to this value. We don’t need to inadvertently train an ASR
system on slow-motion speech!
The Whisper feature extractor performs two operations. It first pads/truncates a batch of audio samples
such that every one samples have an input length of 30s. Samples shorter than 30s are padded to 30s
by appending zeros to the tip of the sequence (zeros in an audio signal corresponding to no signal
or silence). Samples longer than 30s are truncated to 30s. Since all elements
within the batch are padded/truncated to a maximum length within the input space, we do not require
an attention mask when forwarding the audio inputs to the Whisper model.
Whisper is exclusive on this regard – with most audio models, you may expect to supply
an attention mask that details where sequences have been padded, and thus where they
needs to be ignored within the self-attention mechanism. Whisper is trained to operate without
an attention mask and infer directly from the speech signals where to disregard the inputs.
The second operation that the Whisper feature extractor performs is converting the
padded audio arrays to log-Mel spectrograms. These spectrograms are
a visible representation of the frequencies of a signal, slightly like a Fourier transform.
An example spectrogram is shown in Figure 2. Along the -axis are the Mel channels,
which correspond to particular frequency bins. Along the -axis is time. The color of
each pixel corresponds to the log-intensity of that frequency bin at a given time. The
log-Mel spectrogram is the shape of input expected by the Whisper model.
The Mel channels (frequency bins) are standard in speech processing and chosen to approximate
the human auditory range. All we want to know for Whisper fine-tuning is that
the spectrogram is a visible representation of the frequencies within the speech signal. For more detail
on Mel channels, seek advice from Mel-frequency cepstrum.
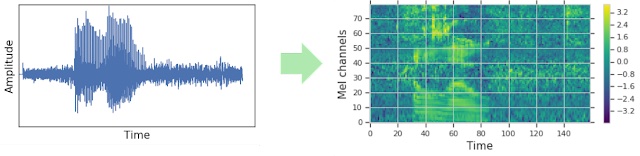
Left: sampled 1-dimensional audio signal. Right: corresponding log-Mel spectrogram. Figure source:
Google SpecAugment Blog.
Luckily for us, the 🤗 Transformers Whisper feature extractor performs each the
padding and spectrogram conversion in only one line of code! Let’s go ahead
and cargo the feature extractor from the pre-trained checkpoint to have ready
for our audio data:
from transformers import WhisperFeatureExtractor

feature_extractor = WhisperFeatureExtractor.from_pretrained("openai/whisper-small")
Load WhisperTokenizer
Now let us take a look at find out how to load a Whisper tokenizer. The Whisper model outputs
text tokens that indicate the index of the anticipated text among the many dictionary
of vocabulary items. The tokenizer maps a sequence of text tokens to the actual
text string (e.g. [1169, 3797, 3332] -> “the cat sat”).
Traditionally, when using encoder-only models for ASR, we decode using
Connectionist Temporal Classification (CTC).
Here we’re required to coach a CTC tokenizer for every dataset we use.
One in every of the benefits of using an encoder-decoder architecture is that
we are able to directly leverage the tokenizer from the pre-trained model.
The Whisper tokenizer is pre-trained on the transcriptions for the 96 pre-training languages.
Consequently, it has an intensive byte-pair
that is acceptable for just about all multilingual ASR applications.
For Hindi, we are able to load the tokenizer and use it for fine-tuning without
any further modifications. We simply must specify the goal language
and the duty. These arguments inform the tokenizer to prefix the language
and task tokens to the beginning of encoded label sequences:
from transformers import WhisperTokenizer

tokenizer = WhisperTokenizer.from_pretrained("openai/whisper-small", language="Hindi", task="transcribe")
Tip: the blog post could be adapted for speech translation by setting the duty to
"translate"and the language to the goal text language within the above line. This can prepend the relevant task and language tokens for speech translation when the dataset is pre-processed.
We are able to confirm that the tokenizer appropriately encodes Hindi characters by
encoding and decoding the primary sample of the Common Voice dataset. When
encoding the transcriptions, the tokenizer appends ‘special tokens’ to the
start and end of the sequence, including the beginning/end of transcript tokens, the
language token and the duty tokens (as specified by the arguments within the previous step).
When decoding the label ids, now we have the choice of ‘skipping’ these special
tokens, allowing us to return a string in the unique input form:
input_str = common_voice["train"][0]["sentence"]
labels = tokenizer(input_str).input_ids
decoded_with_special = tokenizer.decode(labels, skip_special_tokens=False)
decoded_str = tokenizer.decode(labels, skip_special_tokens=True)

print(f"Input:                 {input_str}")
print(f"Decoded w/ special:    {decoded_with_special}")
print(f"Decoded w/out special: {decoded_str}")
print(f"Are equal:             {input_str == decoded_str}")
Print Output:
Input:                 खीर की मिठास पर गरमाई बिहार की सियासत, कुशवाहा ने दी सफाई
Decoded w/ special:    <|startoftranscript|><|hi|><|transcribe|><|notimestamps|>खीर की मिठास पर गरमाई बिहार की सियासत, कुशवाहा ने दी सफाई<|endoftext|>
Decoded w/out special: खीर की मिठास पर गरमाई बिहार की सियासत, कुशवाहा ने दी सफाई
Are equal:             True
Mix To Create A WhisperProcessor
To simplify using the feature extractor and tokenizer, we are able to wrap
each right into a single WhisperProcessor class. This processor object
inherits from the WhisperFeatureExtractor and WhisperProcessor
and could be used on the audio inputs and model predictions as required.
In doing so, we only have to keep track of two objects during training:
the processor and the model:
from transformers import WhisperProcessor

processor = WhisperProcessor.from_pretrained("openai/whisper-small", language="Hindi", task="transcribe")
Prepare Data
Let’s print the primary example of the Common Voice dataset to see
what form the information is in:
print(common_voice["train"][0])
Print Output:
{'audio': {'path': '/home/sanchit_huggingface_co/.cache/huggingface/datasets/downloads/extracted/607848c7e74a89a3b5225c0fa5ffb9470e39b7f11112db614962076a847f3abf/cv-corpus-11.0-2022-09-21/hi/clips/common_voice_hi_25998259.mp3',
           'array': array([0.0000000e+00, 0.0000000e+00, 0.0000000e+00, ..., 9.6724887e-07,
       1.5334779e-06, 1.0415988e-06], dtype=float32),
           'sampling_rate': 48000},
 'sentence': 'खीर की मिठास पर गरमाई बिहार की सियासत, कुशवाहा ने दी सफाई'}
We are able to see that we have got a 1-dimensional input audio array and the
corresponding goal transcription. We have spoken heavily in regards to the
importance of the sampling rate and the proven fact that we want to match the
sampling rate of our audio to that of the Whisper model (16kHz). Since
our input audio is sampled at 48kHz, we want to downsample it to
16kHz before passing it to the Whisper feature extractor.
We’ll set the audio inputs to the right sampling rate using dataset’s
cast_column
method. This operation doesn’t change the audio in-place,
but slightly signals to datasets to resample audio samples on the fly the
first time that they’re loaded:
from datasets import Audio

common_voice = common_voice.cast_column("audio", Audio(sampling_rate=16000))
Re-loading the primary audio sample within the Common Voice dataset will resample
it to the specified sampling rate:
print(common_voice["train"][0])
Print Output:
{'audio': {'path': '/home/sanchit_huggingface_co/.cache/huggingface/datasets/downloads/extracted/607848c7e74a89a3b5225c0fa5ffb9470e39b7f11112db614962076a847f3abf/cv-corpus-11.0-2022-09-21/hi/clips/common_voice_hi_25998259.mp3',
           'array': array([ 0.0000000e+00,  0.0000000e+00,  0.0000000e+00, ...,
       -3.4206650e-07,  3.2979898e-07,  1.0042874e-06], dtype=float32),
           'sampling_rate': 16000},
 'sentence': 'खीर की मिठास पर गरमाई बिहार की सियासत, कुशवाहा ने दी सफाई'}
Great! We are able to see that the sampling rate has been downsampled to 16kHz. The
array values are also different, as we have now only got roughly one amplitude value
for each three we had before.
Now we are able to write a function to arrange our data ready for the model:
- We load and resample the audio data by calling
batch["audio"]. As explained above, 🤗 Datasets performs any vital resampling operations on the fly. - We use the feature extractor to compute the log-Mel spectrogram input features from our 1-dimensional audio array.
- We encode the transcriptions to label ids through using the tokenizer.
def prepare_dataset(batch):

    audio = batch["audio"]


    batch["input_features"] = feature_extractor(audio["array"], sampling_rate=audio["sampling_rate"]).input_features[0]


    batch["labels"] = tokenizer(batch["sentence"]).input_ids
    return batch
We are able to apply the information preparation function to all of our training examples using dataset’s .map method:
common_voice = common_voice.map(prepare_dataset, remove_columns=common_voice.column_names["train"], num_proc=4)
Alright! With that now we have our data fully prepared for training!
Let’s proceed and try how we are able to use this data to
fine-tune Whisper.
Note: Currently datasets makes use of each torchaudio
and librosa for audio loading and resampling.
If you happen to want to implement your personal customised data loading/sampling, you need to use the "path"
column to acquire the audio file path and disrespect the "audio" column.
Training and Evaluation
Now that we have prepared our data, we’re able to dive into the training pipeline.
The 🤗 Trainer
will do much of the heavy lifting for us. All now we have to do is:
-
Load a pre-trained checkpoint: we want to load a pre-trained checkpoint and configure it appropriately for training.
-
Define an information collator: the information collator takes our pre-processed data and prepares PyTorch tensors ready for the model.
-
Evaluation metrics: during evaluation, we would like to guage the model using the word error rate (WER) metric. We’d like to define a
compute_metricsfunction that handles this computation. -
Define the training arguments: these can be utilized by the 🤗 Trainer in constructing the training schedule.
Once we have fine-tuned the model, we are going to evaluate it on the test data to confirm that now we have appropriately trained it
to transcribe speech in Hindi.
Load a Pre-Trained Checkpoint
We’ll start our fine-tuning run from the pre-trained Whisper small checkpoint.
To do that, we’ll load the pre-trained weights from the Hugging Face Hub.
Again, that is trivial through use of 🤗 Transformers!
from transformers import WhisperForConditionalGeneration

model = WhisperForConditionalGeneration.from_pretrained("openai/whisper-small")
At inference time, the Whisper model mechanically detects the language
of the source audio and predicts token ids on this language.
In cases where the source audio language is understood a-priori, akin to
multilingual fine-tuning, it is useful to set the language explicitly.
This negates the scenarios when the wrong language is predicted,
causing the anticipated text to diverge from the true language during
generation. To accomplish that, we set the langauge
and task
arguments to the generation config. We’ll also set any forced_decoder_ids
to None, since this was the legacy way of setting the language and
task arguments:
model.generation_config.language = "hindi"
model.generation_config.task = "transcribe"

model.generation_config.forced_decoder_ids = None
Define a Data Collator
The information collator for a sequence-to-sequence speech model is exclusive within the sense that it
treats the input_features and labels independently: the input_features have to be
handled by the feature extractor and the labels by the tokenizer.
The input_features are already padded to 30s and converted to a log-Mel spectrogram
of fixed dimension, so all now we have to do is convert them to batched PyTorch tensors. We do that
using the feature extractor’s .pad method with return_tensors=pt. Note that no additional
padding is applied here for the reason that inputs are of fixed dimension,
the input_features are simply converted to PyTorch tensors.
Alternatively, the labels are un-padded. We first pad the sequences
to the utmost length within the batch using the tokenizer’s .pad method. The padding tokens
are then replaced by -100 in order that these tokens are not taken into consideration when
computing the loss. We then cut the beginning of transcript token from the start of the label sequence as we
append it later during training.
We are able to leverage the WhisperProcessor we defined earlier to perform each the
feature extractor and the tokenizer operations:
import torch

from dataclasses import dataclass
from typing import Any, Dict, List, Union

@dataclass
class DataCollatorSpeechSeq2SeqWithPadding:
    processor: Any
    decoder_start_token_id: int

    def __call__(self, features: List[Dict[str, Union[List[int], torch.Tensor]]]) -> Dict[str, torch.Tensor]:


        input_features = [{"input_features": feature["input_features"]} for feature in features]
        batch = self.processor.feature_extractor.pad(input_features, return_tensors="pt")


        label_features = [{"input_ids": feature["labels"]} for feature in features]

        labels_batch = self.processor.tokenizer.pad(label_features, return_tensors="pt")


        labels = labels_batch["input_ids"].masked_fill(labels_batch.attention_mask.ne(1), -100)


        if (labels[:, 0] == self.decoder_start_token_id).all().cpu().item():
            labels = labels[:, 1:]

        batch["labels"] = labels

        return batch
Let’s initialise the information collator we have just defined:
data_collator = DataCollatorSpeechSeq2SeqWithPadding(
    processor=processor,
    decoder_start_token_id=model.config.decoder_start_token_id,
)
Evaluation Metrics
Next, we define the evaluation metric we’ll use on our evaluation
set. We’ll use the Word Error Rate (WER) metric, the ‘de-facto’ metric for assessing
ASR systems. For more information, seek advice from the WER docs.
We’ll load the WER metric from 🤗 Evaluate:
import evaluate

metric = evaluate.load("wer")
We then simply must define a function that takes our model
predictions and returns the WER metric. This function, called
compute_metrics, first replaces -100 with the pad_token_id
within the label_ids (undoing the step we applied within the
data collator to disregard padded tokens appropriately within the loss).
It then decodes the anticipated and label ids to strings. Finally,
it computes the WER between the predictions and reference labels:
def compute_metrics(pred):
    pred_ids = pred.predictions
    label_ids = pred.label_ids


    label_ids[label_ids == -100] = tokenizer.pad_token_id


    pred_str = tokenizer.batch_decode(pred_ids, skip_special_tokens=True)
    label_str = tokenizer.batch_decode(label_ids, skip_special_tokens=True)

    wer = 100 * metric.compute(predictions=pred_str, references=label_str)

    return {"wer": wer}
Define the Training Arguments
In the ultimate step, we define all of the parameters related to training. A subset of parameters are
explained below:
output_dir: local directory through which to avoid wasting the model weights. This will even be the repository name on the Hugging Face Hub.generation_max_length: maximum variety of tokens to autoregressively generate during evaluation.save_steps: during training, intermediate checkpoints can be saved and uploaded asynchronously to the Hub everysave_stepstraining steps.eval_steps: during training, evaluation of intermediate checkpoints can be performed everyeval_stepstraining steps.report_to: where to avoid wasting training logs. Supported platforms are"azure_ml","comet_ml","mlflow","neptune","tensorboard"and"wandb". Pick your favourite or leave as"tensorboard"to log to the Hub.
For more detail on the opposite training arguments, seek advice from the Seq2SeqTrainingArguments docs.
from transformers import Seq2SeqTrainingArguments

training_args = Seq2SeqTrainingArguments(
    output_dir="./whisper-small-hi",
    per_device_train_batch_size=16,
    gradient_accumulation_steps=1,
    learning_rate=1e-5,
    warmup_steps=500,
    max_steps=5000,
    gradient_checkpointing=True,
    fp16=True,
    evaluation_strategy="steps",
    per_device_eval_batch_size=8,
    predict_with_generate=True,
    generation_max_length=225,
    save_steps=1000,
    eval_steps=1000,
    logging_steps=25,
    report_to=["tensorboard"],
    load_best_model_at_end=True,
    metric_for_best_model="wer",
    greater_is_better=False,
    push_to_hub=True,
)
Note: if one doesn’t wish to upload the model checkpoints to the Hub,
set push_to_hub=False.
We are able to forward the training arguments to the 🤗 Trainer together with our model,
dataset, data collator and compute_metrics function:
from transformers import Seq2SeqTrainer

trainer = Seq2SeqTrainer(
    args=training_args,
    model=model,
    train_dataset=common_voice["train"],
    eval_dataset=common_voice["test"],
    data_collator=data_collator,
    compute_metrics=compute_metrics,
    tokenizer=processor.feature_extractor,
)
And with that, we’re ready to start out training!
Training
To launch training, simply execute:
trainer.train()
Training will take roughly 5-10 hours depending in your GPU or the one
allocated to the Google Colab. Depending in your GPU, it is feasible
that you’ll encounter a CUDA "out-of-memory" error whenever you start training. On this case,
you may reduce the per_device_train_batch_size incrementally by aspects of two
and employ gradient_accumulation_steps
to compensate.
Print Output:
| Step | Training Loss | Epoch | Validation Loss | WER |
|---|---|---|---|---|
| 1000 | 0.1011 | 2.44 | 0.3075 | 34.63 |
| 2000 | 0.0264 | 4.89 | 0.3558 | 33.13 |
| 3000 | 0.0025 | 7.33 | 0.4214 | 32.59 |
| 4000 | 0.0006 | 9.78 | 0.4519 | 32.01 |
| 5000 | 0.0002 | 12.22 | 0.4679 | 32.10 |
Our greatest WER is 32.0% after 4000 training steps. For reference,
the pre-trained Whisper small model achieves a WER of 63.5%,
meaning we achieve an improvement of 31.5% absolute through fine-tuning.
Not bad for just 8h of coaching data!
We’re now able to share our fine-tuned model on the Hugging Face Hub.
To make it more accessible with appropriate tags and README information,
we are able to set the suitable key-word arguments (kwargs) after we push.
You may change these values to match your dataset, language and model
name accordingly:
kwargs = {
    "dataset_tags": "mozilla-foundation/common_voice_11_0",
    "dataset": "Common Voice 11.0",
    "dataset_args": "config: hi, split: test",
    "language": "hi",
    "model_name": "Whisper Small Hi - Sanchit Gandhi",
    "finetuned_from": "openai/whisper-small",
    "tasks": "automatic-speech-recognition",
}
The training results can now be uploaded to the Hub. To accomplish that, execute the push_to_hub command:
trainer.push_to_hub(**kwargs)
You may now share this model with anyone using the link on the Hub. They can even
load it with the identifier "your-username/the-name-you-picked", as an example:
from transformers import WhisperForConditionalGeneration, WhisperProcessor

model = WhisperForConditionalGeneration.from_pretrained("sanchit-gandhi/whisper-small-hi")
processor = WhisperProcessor.from_pretrained("sanchit-gandhi/whisper-small-hi")
While the fine-tuned model yields satisfactory results on the Common
Voice Hindi test data, it’s under no circumstances optimal. The aim of this
notebook is to exhibit how the pre-trained Whisper checkpoints can
be fine-tuned on any multilingual ASR dataset. The outcomes could likely
be improved by optimising the training hyperparameters, akin to
learning rate and dropout, and using a bigger pre-trained
checkpoint (medium or large-v3).
Constructing a Demo
Now that we have fine-tuned our model, we are able to construct a demo to point out
off its ASR capabilities! We’ll use 🤗 Transformers
pipeline, which can handle your entire ASR pipeline,
right from pre-processing the audio inputs to decoding the
model predictions. We’ll construct our interactive demo with Gradio.
Gradio is arguably probably the most straightforward way of constructing
machine learning demos; with Gradio, we are able to construct a demo in
only a matter of minutes!
Running the instance below will generate a Gradio demo where we
can record speech through the microphone of our computer and input it to
our fine-tuned Whisper model to transcribe the corresponding text:
from transformers import pipeline
import gradio as gr

pipe = pipeline(model="sanchit-gandhi/whisper-small-hi")

def transcribe(audio):
    text = pipe(audio)["text"]
    return text

iface = gr.Interface(
    fn=transcribe,
    inputs=gr.Audio(source="microphone", type="filepath"),
    outputs="text",
    title="Whisper Small Hindi",
    description="Realtime demo for Hindi speech recognition using a fine-tuned Whisper small model.",
)

iface.launch()
Closing Remarks
On this blog, we covered a step-by-step guide on fine-tuning Whisper for multilingual ASR
using 🤗 Datasets, Transformers and the Hugging Face Hub. Confer with the Google Colab
must you want to try fine-tuning for yourself. If you happen to’re excited by fine-tuning other
Transformers models, each for English and multilingual ASR, make sure to try the
examples scripts at examples/pytorch/speech-recognition.