
, I present my latest open-source project — Government Funding Graph.
The inspiration for this project got here from a desire to make higher tooling for grant writing, namely to suggest research topics, funding bodies, research institutions, and researchers. I actually have made Innovate UK grant applications prior to now, so I actually have had an interest in the federal government funding landscape for a while.
Concretely, quite a lot of the recent political discourse focuses on government spending, namely Elon Musk’s Department of Government Efficiency (DOGE) in america and similar sentiments echoed here within the UK, as Kier Starmer looks to integrate AI into government.
Perhaps the discharge of this project is kind of timely. Albeit not the unique intention, I hope as a secondary consequence of this text is that it inspires more exploration into open source datasets for public spending.
I actually have used Networkx & PyVis to visualise the graph of UKRI API data. Then, I detail a LlamaIndex graph RAG implementation. For completeness, I actually have also included my initial LangChain-based solution. The net framework is Streamlit, the demo is hosted on Streamlit community cloud.
This text comprises the next sections.
- Definitions
- UKRI API
- Construct NetworkX Graph
- Filter a NetworkX Graph
- Graph Visualisation Using PyVis
- Graph RAG Using LlamaIndex
- Linting With Pylint
- Streamlit Community Cloud Demo App (on the very end of the article)
1. Definitions
What’s UKRI?
UK Research and Innovation is a non-departmental public body sponsored by the Department for Science, Innovation and Technology (DSIT) that allocates funding for research and development. Generally, funding is awarded to research institutions and businesses.
“We invest £8 billion of taxpayers’ money every year into research and innovation and the individuals who make it occur. We work across an enormous range of fields — from biodiversity conservation to quantum computing, and from space telescopes to progressive health care. We give everyone the chance to contribute and to learn, bringing together people and organisations nationally and globally to create, develop and deploy latest ideas and technologies.” — UKRI Website
What’s a Graph?
A graph is a convenient data structure showing the relationships between different entities (nodes) and their relationships to one another (edges). In some instances, we also associate those relationships with a numerical value.
“In computer science, a graph is an abstract data type that is supposed to implement the undirected graph and directed graph concepts from the sphere of graph theory inside mathematics.
A graph data structure consists of a finite (and possibly mutable) set of vertices (also called nodes or points), along with a set of unordered pairs of those vertices for an undirected graph or a set of ordered pairs for a directed graph. These pairs are often known as edges (also called links or lines), and for a directed graph are also often known as edges but additionally sometimes arrows or arcs.” — Wikipedia
What’s NetworkX?
NetworkX is a useful library on this project to construct and store our graph. Specifically, a digraph though the library supports many graph variants corresponding to multigraphs, the library also supports graph-related utility functions.
“NetworkX is a Python package for the creation, manipulation, and study of the structure, dynamics, and functions of complex networks.” — NetworkX Website
What’s PyVis?
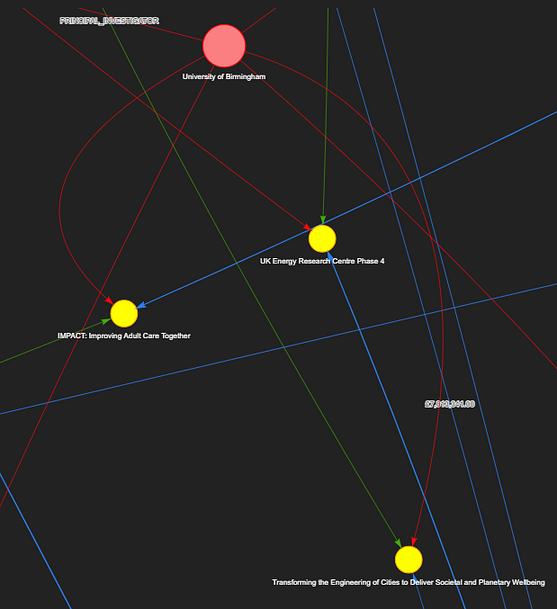
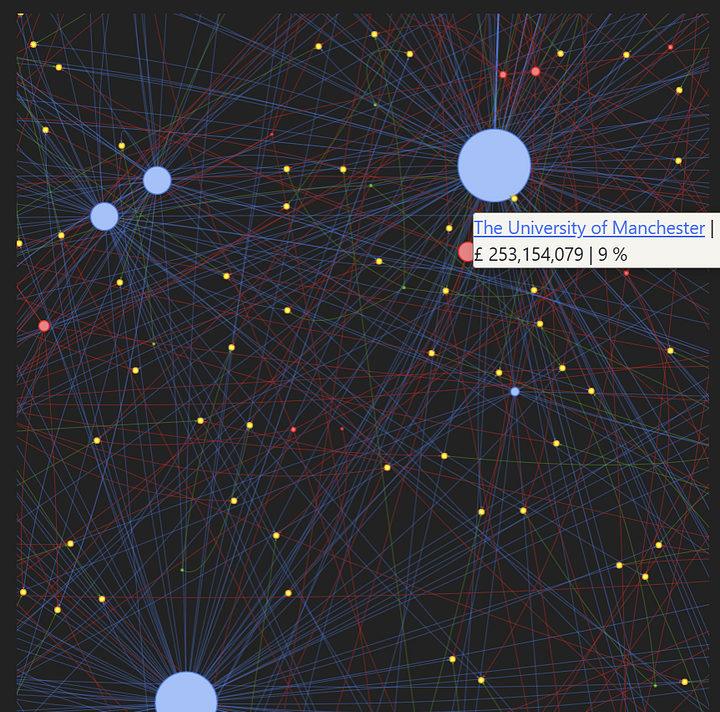
We use the PyVis Python package to create dynamic network views for our graph, screenshots of those will be found throughout the article.
“The pyvis library is supposed for quick generation of visual network graphs with minimal python code. It’s designed as a wrapper around the favored Javascript visJS library” — PyVis Docs
What’s LlamaIndex?
LlamaIndex is a preferred library for LLM applications, including support for agentic workflows, we use it to perform the graph RAG component of this project.
“LlamaIndex (GPT Index) is an information framework in your LLM application. Constructing with LlamaIndex typically involves working with LlamaIndex core and a selected set of integrations (or plugins).” — LlamaIndex Github
What’s Graph RAG?
Retrieval-augmented generation, or RAG because it is usually known, is an AI framework for which additional context from an external knowledge base is used to ground LLM answers. Graph RAG, by extension, pertains to using a Graph to offer this extra context.
“GraphRAG is a robust retrieval mechanism that improves GenAI applications by benefiting from the wealthy context in graph data structures… Basic RAG systems rely solely on semantic search in vector databases to retrieve and rank sets of isolated text fragments. While this approach can surface some relevant information, it fails to capture the context connecting these pieces. Because of this, basic RAG systems are ill-equipped to reply complex, multi-hop questions. That is where GraphRAG is available in. It uses knowledge graphs to represent and connect information to capture not only more data points but additionally their relationships. Thus, graph-based retrievers can provide more accurate and relevant results by uncovering hidden connections that aren’t often obvious but are crucial for correlating information.” — Neo4j Website
What’s Streamlit?
Streamlit is a light-weight Python web framework we are going to use to create the net application for this project.
“Streamlit is an open-source Python framework for data scientists and AI/ML engineers to deliver dynamic data apps with only just a few lines of code. Construct and deploy powerful data apps in minutes.” — Streamlit website
2. UKRI API
The UKRI API is a service that facilitates access to the general public UKRI grant funding dataset, authentication isn’t required and the docs will be found here. I exploit only two endpoints for our application, they’re the Search projects endpoint and the Projects endpoint. This permits a user to go looking for projects based on a keyword search and retrieve all project-specific information.
A search term, page size and page number are provided as query string parameters. The query string parameters;
Be certain that the outcomes are returned by funded value descending.
I actually have also included the code I used for asynchronous pagination.
import math
import requests
import concurrent.futures
import os
from itertools import chain
import urllib.parse
import logging

def search_ukri_projects(args):
    """
    Search UKRI projects based on a search term page size and page number.
    More details will be found here: https://gtr.ukri.org/resources/api.html
    """
    search_term, page_size, page_number = args
    try:
        encoded_search_term = urllib.parse.quote(search_term)
        if (
            (
                response := requests.get(
                    f"https://gtr.ukri.org/api/search/project?term={encoded_search_term}&page={page_number}&fetchSize={page_size}&selectedSortableField=pro.am&selectedSortOrder=DESC&selectedFacets=&fields=project.abs",
                    timeout=10,
                )
            )
            and (response.status_code == 200)
            and (
                items := response.json()
                .get("facetedSearchResultBean", {})
                .get("results")
            )
        ):
            return items
    except Exception as error:
        logging.exception("ERROR search_ukri_projects: %s", error)
    return []

def search_ukri_paginate(search_term, number_of_results, page_size=100):
    """
    Asynchronous pagination requests for project lookup.
    """
    args = [
        (search_term, page_size, page_number + 1)
        for page_number in range(int(math.ceil(number_of_results / page_size)))
    ]
    with concurrent.futures.ThreadPoolExecutor(os.cpu_count()) as executor:
        future = executor.map(search_ukri_projects, args)
    results = [result for result in future if result]
    return list(chain.from_iterable(results))[:number_of_results]
The next function is used to get project-specific data using the unique UKRI project reference. The project reference is derived from the aforementioned project search results.
import requests
import logging

def get_ukri_project_data(project_grant_reference):
    """
    Search UKRI project data based on grant reference.
    """
    try:
        if (
            (
                response := requests.get(
                    f"https://gtr.ukri.org/api/projects?ref={project_grant_reference}",
                    timeout=10,
                )
            )
            and (response.status_code == 200)
            and (items := response.json().get("projectOverview", {}))
        ):
            return items
    except Exception as error:
        logging.exception("ERROR get_ukri_project_data: %s", error)
Similarly, we parse out the relevant data for the development of the graph and take away superfluous information.
def parse_data(projects):
    """
    Parse project data right into a usable format and validate.
    """
    data = []
    for project in projects:
        project_composition = project.get("projectComposition", {})
        project_data = project_composition.get("project", {})
        fund = project_data.get("fund", {})
        funder = fund.get("funder")
        value_pounds = fund.get("valuePounds")
        lead_research_organisation = project_composition.get("leadResearchOrganisation")
        person_roles = project_composition.get("personRoles")
        if all(
            [
                project_composition,
                project_data,
                fund,
                funder,
                value_pounds,
                lead_research_organisation,
            ]
        ):
            record = {}
            record["funder_name"] = funder.get("name")
            record["funder_link"] = funder.get("resourceUrl")
            record["project_title"] = project_data.get("title")
            record["project_grant_reference"] = project_data.get("grantReference")
            record["value"] = value_pounds
            record["lead_research_organisation"] = lead_research_organisation.get(
                "name", ""
            )
            record["lead_research_organisation_link"] = lead_research_organisation.get(
                "resourceUrl", ""
            )
            record["people"] = person_roles
            record["project_url"] = project_data.get("resourceUrl")
            data.append(record)
    return data
3. Construct NetworkX Graph
There are various kinds of graphs, and I elected for a directed graph where the direction of the perimeters are necessary. More formally;
“A DiGraph stores nodes and edges with optional data, or attributes. DiGraphs hold directed edges. Self loops are allowed but multiple (parallel) edges are usually not.” — NetworkX Website
To construct the NetworkX graph, we must add nodes and edges — including the sequential updating of node attributes.
The usual attributes, compatible with PyVis graph rendering for nodes are as follows;
- Title (The label that appears on hover over)
- Group (The color coding)
- Size (How large the nodes appear within the graph)
We also use the custom attribute “funding”, which we are going to use to sum all the funding for research and funding organizations. This might be normalized to set the node size in accordance with the proportion of total funding for a specific group.
For our graph, now we have nodes from 4 groups. They’re classified as: funder_name, lead_research_organisation, project_title and person_name.
HTML links will be utilized in the node title to permit the user to simply click through to a URL. I actually have included a helper function to do that below. There are project, people, and research organisation-specific links that, if redirected to offer additional information to the user.
The code to construct the NetworkX graph will be seen below. The DiGraph class has methods to ascertain if a graph already has a node and similarly for edges. There are also methods for adding nodes and edges. As we iterate through projects, we would like to sum the entire funding amount for the funding organization and lead research institution. There are methods to each get an attribute from a node within the graph and set an attribute on a node. Depending on the source and destination node, we also apply different titles and labels to reflect that specific predicate. These will be seen within the code below.
import networkx as nx

def get_link_html(link, text):
    """
    Helper function to construct a HTML link.
    """
    return f"""{text}"""

def set_networkx_attribute(graph, node_label, attribute_name, value):
    """
    Helper to set attribute for networkx graph.
    """
    attrs = {node_label: {attribute_name: value}}
    nx.set_node_attributes(graph, attrs)

def append_networkx_value(graph, node_label, attribute_name, value):
    """
    Helper to append value to current node attribute scalar value.
    """
    current_map = nx.get_node_attributes(graph, attribute_name, default=0)
    current_value = current_map[node_label]
    current_value = current_value + value
    set_networkx_attribute(graph, node_label, attribute_name, current_value)

def create_networkx(data):
    """
    Create networkx graph from UKRI data.
    """
    graph = nx.DiGraph()
    for row in data:
        if (
            (funder_name := row.get("funder_name"))
            and (project_title := row.get("project_title"))
            and (lead_research_organisation := row.get("lead_research_organisation"))
        ):

            project_data_lookup = row.get("project_data_lookup", {})

            if not graph.has_node(funder_name):
                graph.add_node(
                    funder_name, title=funder_name, group="funder_name", size=100
                )
            if not graph.has_node(project_title):
                link_html = get_link_html(
                    row.get("project_url", "").replace("api/", ""), project_title
                )
                graph.add_node(
                    project_title,
                    title=link_html,
                    group="project_title",
                    project_data_lookup=project_data_lookup,
                    size=25,
                )
            if not graph.has_edge(funder_name, project_title):
                graph.add_edge(
                    funder_name,
                    project_title,
                    value=row.get("value"),
                    title=f"{'£{:,.2f}'.format(row.get('value'))}",
                    label=f"{'£{:,.2f}'.format(row.get('value'))}",
                )

        if not graph.has_node(lead_research_organisation):
            link_html = get_link_html(
                row.get("lead_research_organisation_link").replace("api/", ""),
                lead_research_organisation,
            )
            graph.add_node(
                lead_research_organisation,
                title=link_html,
                group="lead_research_organisation",
                size=50,
            )
        if not graph.has_edge(lead_research_organisation, project_title):
            graph.add_edge(
                lead_research_organisation, project_title, title="RELATES TO"
            )

        append_networkx_value(graph, funder_name, "funding", row.get("value", 0))
        append_networkx_value(graph, project_title, "funding", row.get("value", 0))
        append_networkx_value(
            graph, lead_research_organisation, "funding", row.get("value", 0)
        )

        person_roles = row.get(
            "people", []
        )

        for person in person_roles:
            if (
                (person_name := person.get("fullName"))
                and (person_link := person.get("resourceUrl"))
                and (project_title := row.get("project_title"))
                and (roles := person.get("roles"))
            ):
                if not graph.has_node(person_name):
                    link_html = get_link_html(
                        person_link.replace("api/", ""), person_name
                    )
                    graph.add_node(
                        person_name, title=link_html, group="person_name", size=10
                    )
                for role in roles:
                    if (not graph.has_edge(person_name, project_title)) or (
                        not graph[person_name][project_title]["title"]
                        == role.get("name")
                    ):
                        graph.add_edge(
                            person_name,
                            project_title,
                            title=role.get("name"),
                            label=role.get("name"),
                        )
    return graph
Once the graph has been constructed and as previously described, I desired to normalize the node sizes depending on the proportion of the entire amount of funding for particular groups. I also append the entire funding, each as a summation and as a percentage to the node label so it will probably be more easily viewed by a user.
The dimensions factor is only a multiple applied for aesthetic reasons, such that the node sizes appear relative to the opposite node groups present.
import networkx as nx
import math
import utils.config as config  # pylint: disable=consider-using-from-import, import-error

def set_networkx_attribute(graph, node_label, attribute_name, value):
    """
    Helper to set attribute for networkx graph.
    """
    attrs = {node_label: {attribute_name: value}}
    nx.set_node_attributes(graph, attrs)

def calculate_total_funding_from_group(graph, group):
    """
    Helper to calculate total funding for a bunch.
    """
    return sum(
        [
            data.get("funding")
            for node_label, data in graph.nodes(data=True)
            if data.get("funding") and data.get("group") == group
        ]
    )

def set_weighted_size_helper(graph, node_label, totals, data):
    """
    Create normalized weights based on percentage funding amount.
    """
    if (
        (group := data.get("group"))
        and (total_funding := totals.get(group))
        and (funding := data.get("funding"))
    ):
        div = funding / total_funding
        funding_percentage = math.ceil(((100.0 * div)))
        set_networkx_attribute(graph, node_label, "size", funding_percentage)

def annotate_value_on_graph(graph):
    """
    Calculate normalized graph sizes and append to title.
    """
    totals = {}
    for group in ["lead_research_organisation", "funder_name"]:
        totals[group] = calculate_total_funding_from_group(graph, group)

    for node_label, data in graph.nodes(data=True):
        if (
            (funding := data.get("funding"))
            and (group := data.get("group"))
            and (title := data.get("title"))
        ):
            new_title = f"{title} | {'£ {:,.0f}'.format(funding)}"
            if total_funding := totals.get(group):
                div = funding / total_funding
                funding_percentage = math.ceil(((100.0 * div)))
                set_networkx_attribute(
                    graph,
                    node_label,
                    "size",
                    config.NODE_SIZE_SCALE_FACTOR * funding_percentage,
                )
                new_title += f" | {' {:,.0f}'.format(funding_percentage)} %"

            set_networkx_attribute(graph, node_label, "title", new_title)
4. Filter a NetworkX Graph

I allow the user to filter nodes via the UI to create a subgraph. The shape to do that in Streamlit is below. I also find the neighbors of neighbors for the filtered nodes. I had some issues with Pylint raising unnecessary comprehension errors from the generator, which I actually have disabled — more on Pylint later within the article. A smaller graph will take less time to render and can be certain that irrelevant context might be excluded.
import networkx as nx
import streamlit as st

def find_neighbor_nodes_helper(node_list, graph):
    """
    Find unique node neighbors and flatten.
    """
    successors_generator_array = [
        # pylint: disable=unnecessary-comprehension
        [item for item in graph.successors(node)]
        for node in node_list
    ]
    predecessors_generator_array = [
        # pylint: disable=unnecessary-comprehension
        [item for item in graph.predecessors(node)]
        for node in node_list
    ]
    neighbors = successors_generator_array + predecessors_generator_array
    flat = sum(neighbors, [])
    return list(set(flat))

def render_filter_form(annotated_node_data, graph):
    """
    Render form to permit the user to define search nodes.
    """
    st.session_state["filter"] = st.radio(
        "Filter", ["No filter", "Filter results"], index=0, horizontal=True
    )
    if (filter_determinant := st.session_state.get("filter")) and (
        filter_determinant == "Filter results"
    ):
        st.session_state["node_group"] = st.selectbox(
            "Entity type", list(annotated_node_data.keys())
        )
        if node_group := st.session_state.get("node_group"):
            ordered_lookup = dict(
                sorted(
                    annotated_node_data[node_group].items(),
                    key=lambda item: item[1].get("neighbor_len"),
                    reverse=True,
                )
            )
            st.session_state["search_nodes_label"] = st.multiselect(
                "Filter projects", list(ordered_lookup.keys())
            )
        if search_nodes_label := st.session_state.get("search_nodes_label"):
            filter_nodes = [
                ordered_lookup[label].get("label") for label in search_nodes_label
            ]
            search_nodes_neighbors = find_neighbor_nodes_helper(filter_nodes, graph)
            search_nodes = find_neighbor_nodes_helper(search_nodes_neighbors, graph)
            st.session_state["search_nodes"] = list(
                set(search_nodes + filter_nodes + search_nodes_neighbors)
            )
NetworkX makes it easy to create a subgraph from a listing of nodes with the subgraph_view function, which takes a callable as a parameter. The callable takes a graph node as a parameter and if the boolean True value is returned, the node can be included within the subgraph.
import networkx as nx
import streamlit as st

def filter_node(node):
    """
    Check to see if the filter term is within the nodes chosen.
    """
    if (
        (filter_term := st.session_state.get("filter"))
        and (filter_term == "Filter results")
        and (search_nodes := st.session_state.get("search_nodes"))
    ):
        if node not in search_nodes:
            return False
    return True

graph = nx.subgraph_view(graph, filter_node=filter_node)
5. Graph Visualisation Using PyVis
To supply the visualizations I actually have presented earlier within the article, we must first convert the NetworkX graph to a PyVis network after which render the HTML file throughout the Streamlit UI.
Should you are unfamiliar with Streamlit, you possibly can see one in every of my other articles that explore the subject here.
Converting a NetworkX graph to PyVis format is comparatively trivial and will be achieved with the code below. The Network class is the most important class for visualization functionality, first we instantiate the category and in this instance, the graph is directed. The barnes_hut method is then called, which is a gravity model. The from_nx method takes an existing NetworkX graph as an argument and translates it to PyVis, which is known as in place.
from pyvis.network import Network

def convert_graph(graph):
    """
    Convert networkx to pyvis graph.
    """
    net = Network(
        height="700px",
        width="100%",
        bgcolor="#222222",
        font_color="white",
        directed=True,
    )
    net.barnes_hut()
    net.from_nx(graph)
    return net
To render the Graph to the UI, we first create a novel user ID as we use the PyVis save_graph method to save lots of the HTML file for the graph on the server. The uuid ensures a novel file name, which is then read into the streamlit UI and after the file is deleted.
import uuid
import contextlib
import os
import streamlit as st

def render_graphs(net):
    """
    Helper to render graph visualization from pyvis graph.
    """
    uuid4 = uuid.uuid4()
    file_name = f"./output/{uuid4}.html"
    with contextlib.suppress(FileNotFoundError):
        os.remove(file_name)
    net.save_graph(file_name)
    with open(file_name, "r", encoding="utf-8") as html_file:
        source_code = html_file.read()
    st.components.v1.html(source_code, height=650, width=650)
    os.remove(file_name)
6. Graph RAG Using LlamaIndex

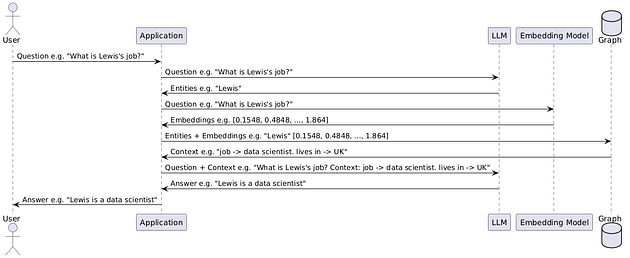
Through graph retrieval-augmented generation, we are able to query our graph data directly, an example will be seen within the prior screenshot. Extracted entities from the user query are looked up within the graph to present specific context to the AI to ground its response, as this information would likely not have been within the training corpus, and hence any answer given would have had an increased likelihood of being a hallucination.
We create a chat engine to pass a user’s previous query history into the model. Often, the Open AI API secret’s read as an environment variable inside LlamaIndex — nonetheless, since that is user-submitted for our application and we don’t want to save lots of users’ Open AI credentials, we want to pass credentials to the LLM and embedding model classes as keyword arguments.
We then create an empty LlamaIndex Knowledge Graph Index and populate the knowledge graph by inserting triples. The triples come from traversing the perimeters of our NetworkX graph and calling the upsert_triplet_and_node method, which is able to create the triple and node in the event that they don’t exist already.
Because the graph is directed, we are able to interchange the topics and objects in order that the graph is traversable in either direction. The chat engine uses the tree_summarize option for the response builder.
“Tree summarize response builder. This response builder recursively merges text chunks and summarizes them in a bottom-up fashion (i.e. constructing a tree from leaves to root). More concretely, at each recursively step: 1. we repack the text chunks in order that each chunk fills the context window of the LLM 2. if there is just one chunk, we give the ultimate response 3. otherwise, we summarize each chunk and recursively summarize the summaries.”— LlamaIndex Website
Calling the chat method with the user’s query and constructing the chat history from the Streamlit state object is included here.
from llama_index.core import KnowledgeGraphIndex
from llama_index.core.schema import TextNode
from llama_index.embeddings.openai import OpenAIEmbedding
from llama_index.llms.openai import OpenAI
from llama_index.core.llms import ChatMessage, MessageRole
import streamlit as st
import utils.ui_utils as ui_utils  # pylint: disable=consider-using-from-import, import-error

def init_llama_index_graph(graph_nx, open_ai_api_key):
    """
    Construct a knowledge graph using llama index.
    """
    llm = OpenAI(model="gpt-3.5-turbo", api_key=open_ai_api_key)
    embed_model = OpenAIEmbedding(api_key=open_ai_api_key)

    graph = KnowledgeGraphIndex(
        [], llm=llm, embed_model=embed_model, api_key=open_ai_api_key
    )

    for subject_entity, object_entity in graph_nx.edges():
        predicate = graph_nx[subject_entity][object_entity].get("label", "pertains to")
        graph.upsert_triplet_and_node(
            (subject_entity, predicate, object_entity), TextNode(text=subject_entity)
        )
        graph.upsert_triplet_and_node(
            (object_entity, predicate, subject_entity), TextNode(text=subject_entity)
        )

    chat_engine = graph.as_chat_engine(
        include_text=True,
        response_mode="tree_summarize",
        embedding_mode="hybrid",
        similarity_top_k=5,
        verbose=True,
        llm=llm,
    )

    return chat_engine

def add_result_to_state(query, response):
    """
    Add model output to state.
    """
    if response:
        graph_answers = st.session_state.get("graph_answers") or []
        graph_answers.append((query, response))
        st.session_state["graph_answers"] = graph_answers
    else:
        st.error("Query failed, please try again later.", icon="⚠️")

def query_llama_index_graph(query_engine, query):
    """
    Query llama index knowledge graph using graph RAG.
    """
    graph_answers = st.session_state.get("graph_answers", [])
    chat_history = []
    for query, answer in graph_answers:
        chat_history.append(ChatMessage(role=MessageRole.USER, content=query))
        chat_history.append(
            ChatMessage(role=MessageRole.ASSISTANT, content=answer)
        )

    if response := query_engine.chat(query, chat_history):
        add_result_to_state(query, response.response)
Similarly, I initially explored a LangChain implementation, though during some experimentation, I made a decision to proceed wth the LlamaIndex-based approach previously demonstrated. For reference, I actually have included this below if it is helpful to you.
Within the interest of brevity, the reason is omitted, though it must be self-explanatory for the reader.
from langchain_community.chains.graph_qa.base import GraphQAChain
from langchain_community.graphs import NetworkxEntityGraph
from langchain_community.graphs.networkx_graph import KnowledgeTriple
from langchain_openai import ChatOpenAI
import streamlit as st

def add_result_to_state(query, response):
    """
    Add model output to state.
    """
    if response:
        graph_answers = st.session_state.get("graph_answers") or []
        graph_answers.append((query, response))
        st.session_state["graph_answers"] = graph_answers
    else:
        st.error("Query failed, please try again later.", icon="⚠️")

def construct_graph_langchain(graph_nx, open_ai_api_key, query):
    """
    Construct a knowledge graph in Langchain and preform graph RAG.
    """
    graph = NetworkxEntityGraph()
    for node in graph_nx:
        graph.add_node(node)

    for subject_entity, object_entity in graph_nx.edges():
        predicate = graph_nx[subject_entity][object_entity].get("label", "pertains to")
        graph.add_triple(KnowledgeTriple(subject_entity, predicate, object_entity))

    llm = ChatOpenAI(
        api_key=open_ai_api_key, model="gpt-4", temperature=0, max_retries=2
    )

    chain = GraphQAChain.from_llm(llm=llm, graph=graph, verbose=True)

    if response := chain.invoke({"query": query}):
        answer = response.get("result")
        add_result_to_state(query, answer)
7. Linting With Pylint

Since I actually have left some comments within the code to disable the linter within the examples above (examples are referenced from the GitHub repo), I believed I’d cover the subject of linting briefly.
For those unfamiliar, linting helps to ascertain your code for potential bugs and stylistic issues. Linters mechanically implement coding standards.
To start, install Pylint by running the command.
pip install pylintSecondly, we want to create a .pylintrc file at the foundation of the project (we also can set default global and user-specific settings depending on where we create the .pylintrc file). To do that, you have to to run.
pylint --generate-rcfile > .pylintrcWe will configure this file to suit our preferences by updating the default values throughout the .pylintrc file.
To run the linter manually, you should use.
pylint ./most important.py && pylint ./**/*.pyWhen the Docker image is built, it is going to mechanically run Pylint and lift an error should it detect a problem with the code. This will be seen within the Dockerfile.
FROM python:3.10.16 AS base

WORKDIR /app

COPY requirements.txt .

RUN pip install --upgrade pip

RUN pip install -r requirements.txt

COPY . .

RUN mkdir -p /app/output

RUN pylint ./most important.py && pylint ./**/*.py

RUN python -m unittest -v tests.test_ukri_utils.Testing

CMD ["streamlit", "run", "./main.py"]
A well-liked formatter that you just may additionally find useful is Black —
“ is a PEP 8 compliant opinionated formatter. reformats entire files in place.”
Running Black will mechanically resolve a few of the issues that might be raised by the linter.
8. Streamlit Community Cloud Demo App
With Streamlit Community Cloud, anyone can host their application without spending a dime. If you may have an application you’d wish to deploy, you possibly can follow this tutorial.
To see the hosted demo, please click the link below.
https://governmentfundinggraph.streamlit.app
Thanks for reading my article — as promised, you could find all of the code within the GitHub repo here.
Any and all feedback is priceless to me because it provides direction for my future projects. Should you found this text useful, please let me know.
It’s also possible to find me over on LinkedIn if you may have specific questions.
Eager about open-source AI grant writing projects? Enroll for our mailing list here.
*All images, unless otherwise noted, are by the writer.